I would recommend baking a normal map for it, im pretty sure all weapons in RO2 have them. Can you post some wireframes and current tri count? Good luck on your project!
")
Well there's no straight answer for that.
In the past I was concerned with going over poly counts for the UE2 Engine, rather than go full quality and then dumb it down to what it needed. This time around I'm going to design based on full quality ~ what it should look like and chop it down to the required polys afterwards.
Currently it is designed as a NURBS object to give me the full quality look without dealing with a huge poly/quad count while working, which will then be converted into Polys after I'm done. The great thing about Maya is that it's very easy to take an object and convert it to NURBS, Polys or SubDivs, and then back to SubDivs, Polys or NURBS at any time during the design process. In early versions of Maya, this wasn't so easy to do, and I don't know if 3D Studio Max has a similar ability that doesn't screw things up (as it's been a long time since I bothered to use that program), but that's one of the reasons why I like Maya.
Process to get to this point:
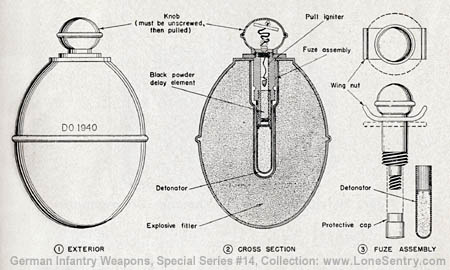
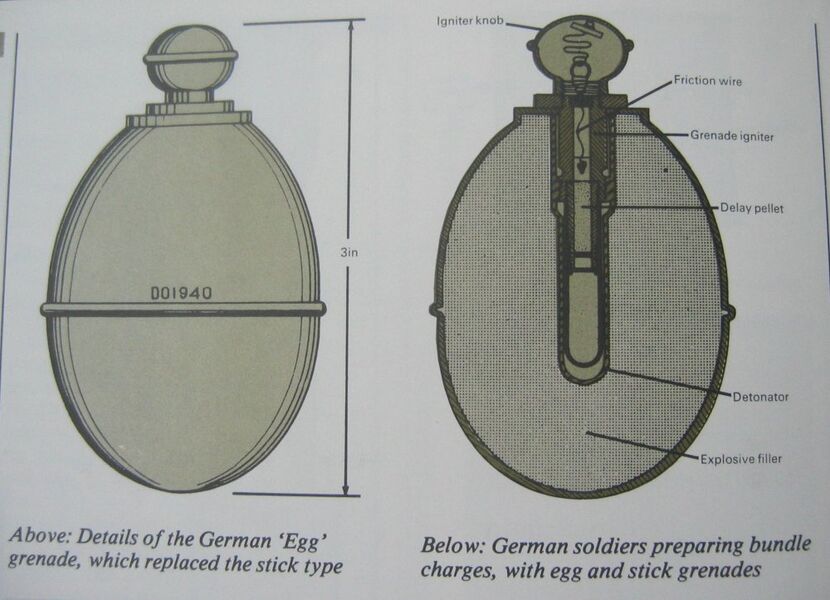
Went into Adobe Illustrator, laid out a side-profile diagram of the grenade, then created a vector line around the outside of one half of the image for each part of the grenade. I then removed the image from the file and exported the vector lines into a DXF file which was then imported into Maya 2012.
In Maya, I imported the file, then selected each vector line and went into Surfaces > Revolve, which is the quickest, easiest and most accurate method of getting this kind of shape imo.
I could have imported the side profile image of the grenade directly into Maya and then try to trace out half the grenade using the vector line tools in Maya, but I'm better with the tools in Illustrator, and am more accustomed to the alignment / snap-to / rulers in Illustrator for accurate tracing. I've also found there ends up being more steps involved when trying to do it all in Maya and takes up a bit more time, as you have to make a poly rectangle, try and get it to the proper ratio as the image you're going to use, then apply a planer map, select the color of that map and pick file, import the photo and hope nothing got skewed in the process. Then I have to play around with the curves/vector tools to trace around the image, which I find in Maya, they sometimes have a mind of their own when you move the vertex points around..... in Illustrator, I import the image, trace it.... export the file, done.
And I was incorrect on my time spent on the actual modeling in Maya above. I said 45 mins, but I was fiddling around with a few things for my own amusment at the time, so total time spent in Illustrator and in Maya to get the image you see above is actually around 15 mins.
As I go through this thread and the progression of this modeling, I will probably do what I did in the old RO Mod Forums with my Stug III, and make this thread as a tutorial for others modeling in Maya.
I'll back track a bit and go back to the start and provide screen shots and the step by step processes I use.
This project will use Adobe Illustrator, Adobe Photoshop and AutoDesk Maya 2012. Photoshop will be used for making textures, as well as modifying any diagrams and images I use for laying out models in Maya.... and Illustrator isn't actually necessary for people to use for modeling in Maya, but I use it anyways.