

You are using an out of date browser. It may not display this or other websites correctly.
You should upgrade or use an alternative browser.
You should upgrade or use an alternative browser.
3D & Animation The DrGuppy Static Mesh Thread! *applause*
- Thread starter [TW]DrGuppy
- Start date
Looks good, the car is especially nice. You're doing some good stuff, the only suggestion I can make is some smoothing group related stuff with that signboard rounded section and with some other models. Also, I would experiment with your textures with adding some wear and grind to them, I think that will help them out a bit. Also I would work on the snowy parts, I'm not sure what technique you are using but it looks a little artificial currently. I haven't really done much with snowy stuff, but I would suggest not painting white over a texture, rather use a layer of a nice terrain snow texture and cut away at it with the eraser. Use a harder edge that what you seem to have been using prior to now. Lower the opacity of the snow slightly and go to work with the burn to give it some depth. Spend some time on getting a nice technique and then you can easily apply it to anything to give it a nice frosted look pretty quickly.
Upvote
0
Good suggestions FlashPanHunter. I always keep a .psd file with all the layers seperate so I can easily go back and change an individual part of the texture, such as the snow. I'll try to get the snow technique to look better, I'm not too happy with what it looks like at the moment but I'm getting better at it, I think. I'm not really sure what you mean by 'smoothing groups' but I'll Google it tonight.
Thanks for the comment as well FYROM.")
Edit:
Worked on the texture for a few hours tonight. I found some snow pictures, cut out the snow from them, then pasted/edited it in to place where my previous snow layers were. I also added a touch more dirt to the texture althought it's hardly noticeable. I think the snow looks much better now, thanks again Flash. Does it look better to you guys? Other than that is there anything else to work on? Oh, and I also tried to find out what 'Smoothing Groups' were and the only thing I could find similar in Maya was the Soften/Harden feature but I couldn't get it to actually change anything.
Thanks for the comment as well FYROM.
Edit:
Worked on the texture for a few hours tonight. I found some snow pictures, cut out the snow from them, then pasted/edited it in to place where my previous snow layers were. I also added a touch more dirt to the texture althought it's hardly noticeable. I think the snow looks much better now, thanks again Flash. Does it look better to you guys? Other than that is there anything else to work on? Oh, and I also tried to find out what 'Smoothing Groups' were and the only thing I could find similar in Maya was the Soften/Harden feature but I couldn't get it to actually change anything.
Last edited:
Upvote
0
Wow.. The Gaz was an expected suprise!..
The signs, signboard, and grate are all pretty basic models, but the Gaz is getting up there in complexity
very nice!
(basically, I'm saying that i'm envious of you.. )
The signs, signboard, and grate are all pretty basic models, but the Gaz is getting up there in complexity
very nice!
(basically, I'm saying that i'm envious of you.. )
Upvote
0
Looks much better than before. I actually experimented a little bit last night and it's really a bit tougher than I would have guessed . I recomend doing two snow layers, one for a frosty look and one for actual acumulated snow. The frost layer will have a bit of opactity, but make it irregular, so some parts that are almost transparent and some that are less so. (A good job with this will look very nice over your paper I think) Your snow is quite white too, I think for ingame purposes, you may want to get it a little darker and with some more blue. More granulation too, that will help make it look more natural.
Using the burn tool was a bad suggestion, I couldn't get a good look with it at all.
Also, as with adding dirt and grime to clean textures, the irregular brushes are your best tool, use them for pretty much everything including erasing and lightening the opacity, even with the burn tool if you can get some good results with it.
Keep it up!
. I recomend doing two snow layers, one for a frosty look and one for actual acumulated snow. The frost layer will have a bit of opactity, but make it irregular, so some parts that are almost transparent and some that are less so. (A good job with this will look very nice over your paper I think) Your snow is quite white too, I think for ingame purposes, you may want to get it a little darker and with some more blue. More granulation too, that will help make it look more natural.Using the burn tool was a bad suggestion, I couldn't get a good look with it at all.
Also, as with adding dirt and grime to clean textures, the irregular brushes are your best tool, use them for pretty much everything including erasing and lightening the opacity, even with the burn tool if you can get some good results with it.
Keep it up!
Upvote
0
Wow Guppy, very nice stuff in there. A tiny crit from me though, on the hunting store logo, the first letter is not "Я", its actually "C". I think the panel behind the first letter has some sort of glare on it, or is just a lighter color.
Upvote
0
Hey BrOkEn, glad to see you over here!
I've been quite busy this past week and haven't gotten as much done as I've liked to. Mostly just UV maps and experimenting with different things such as transparency on the textures, which hasn't gone too well so far. I'll try to get an update sometime after the weekend but I'm not sure if I'll have any presentable stuff by then. Thanks for taking interest everyone and thanks for the clarification on the sign Pycckuu, no wonder I had so many problems with the Russian translation sites!
I've been quite busy this past week and haven't gotten as much done as I've liked to. Mostly just UV maps and experimenting with different things such as transparency on the textures, which hasn't gone too well so far. I'll try to get an update sometime after the weekend but I'm not sure if I'll have any presentable stuff by then. Thanks for taking interest everyone and thanks for the clarification on the sign Pycckuu, no wonder I had so many problems with the Russian translation sites!
Upvote
0
Well Ostfront is almost here and I wanted to have the Gaz M1 completed today but that isn't going to happen unfortunately. I will however show you my progress on it. Please note that anything that looks bright red and out of place will be completely transparent in game.
Gaz M1 Wheel Final - (Poly Count = 156)


Gaz M1 Body WIP - (Poly Count = 1334)
*Model is final, texture is definately not*


I apologize for the shortness of this update and will probably not update this again for a while because tomorrow I get to play Ostfront and a few days after that I'll be going all out with mapping. Thank you all for the comments and feedback so far, I'm really grateful to have it!
Please note that anything that looks bright red and out of place will be completely transparent in game.Gaz M1 Wheel Final - (Poly Count = 156)


Gaz M1 Body WIP - (Poly Count = 1334)
*Model is final, texture is definately not*


I apologize for the shortness of this update and will probably not update this again for a while because tomorrow I get to play Ostfront and a few days after that I'll be going all out with mapping. Thank you all for the comments and feedback so far, I'm really grateful to have it!
Upvote
0
WOWO!!1 I'm going to pilfer your map when it comes out....just be prepared for some static mesh rapine.
Upvote
0
Maya
Maya
Saw you are using Maya Personal Learning Addition 7.0 I thought the learning addition prevents you from rendering without a stamp across the output and prevents you from exporting. Is this not the case?
Maya
Saw you are using Maya Personal Learning Addition 7.0 I thought the learning addition prevents you from rendering without a stamp across the output and prevents you from exporting. Is this not the case?
Upvote
0
The textures for my static meshes were all created in Photoshop so they will not have watermarks on them in-game. Only the model has watermarks inside of Maya. You can export Maya PLE meshes but it is a bit tricky because the ActorX plug-in doesn't work for PLE. You need to download the UT2004 plug-in, export the mesh to UEd (UT2K4 version) save the mesh as a new package, and finally move the new .utx file into the Ostfront static mesh folder. Here's proof that you can get them in-game though with a little work:


I'm in the process of UV mapping the trolleybus and should have an update within the week as I get more of my static meshes into the game.


I'm in the process of UV mapping the trolleybus and should have an update within the week as I get more of my static meshes into the game.
Upvote
0
This looks all beautiful. Only the signboard is wrong, the other side is the same as the front (it's like a pillar). Put both together and you have one.
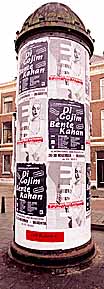 http://www.nrc.nl/W2/Lab/Profiel/Reclame/Zuil.jpg
Upvote
0
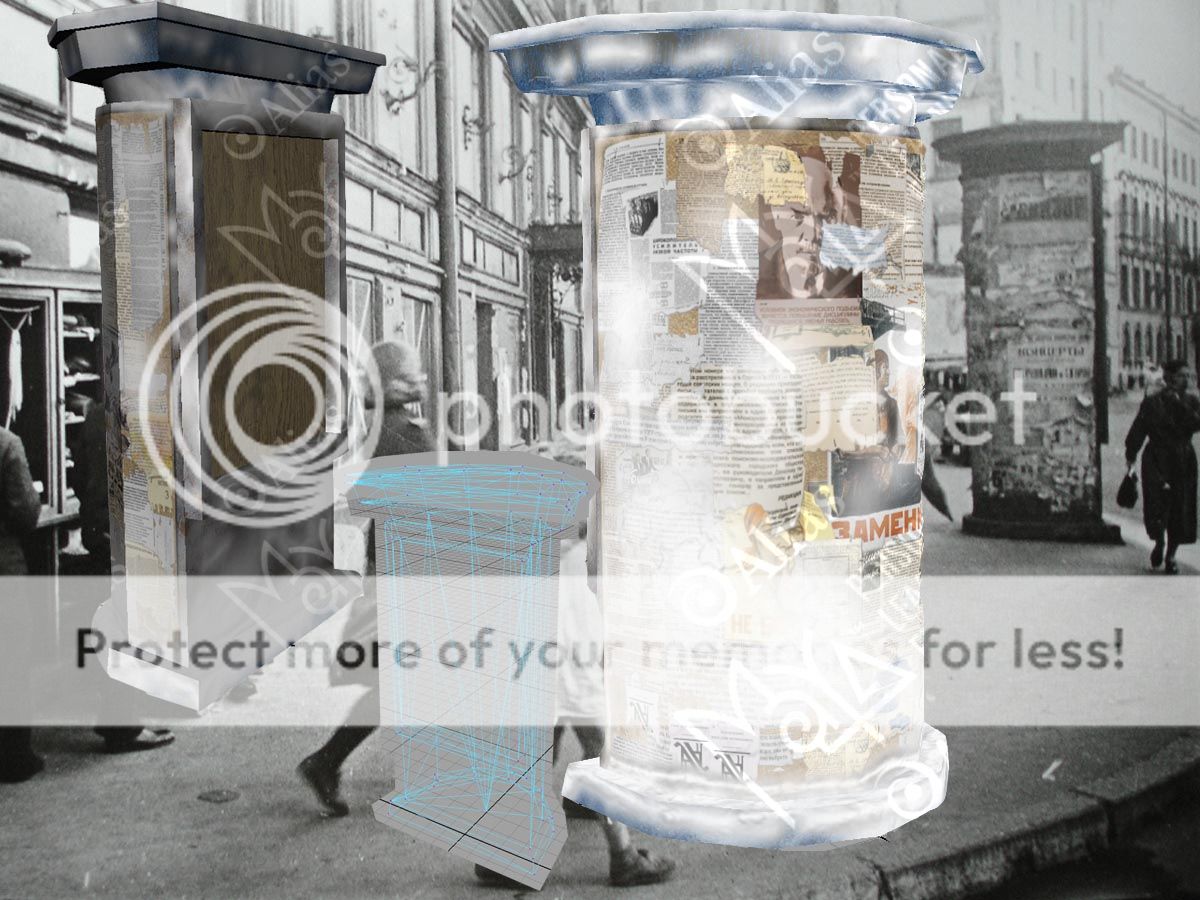
Well I guess since you bumped my thread I should use it as a reason to stop being lazy and update this thread. Sander the Sign Board is definately a different version than the one in that picture. To quote myself from earlier in this thread:
To date I've made 50 static meshes for my mapping purposes but most are fairly simple objects that come in at 100 polys or less. Here's 3 of the more complicated static meshes I've finished recently:


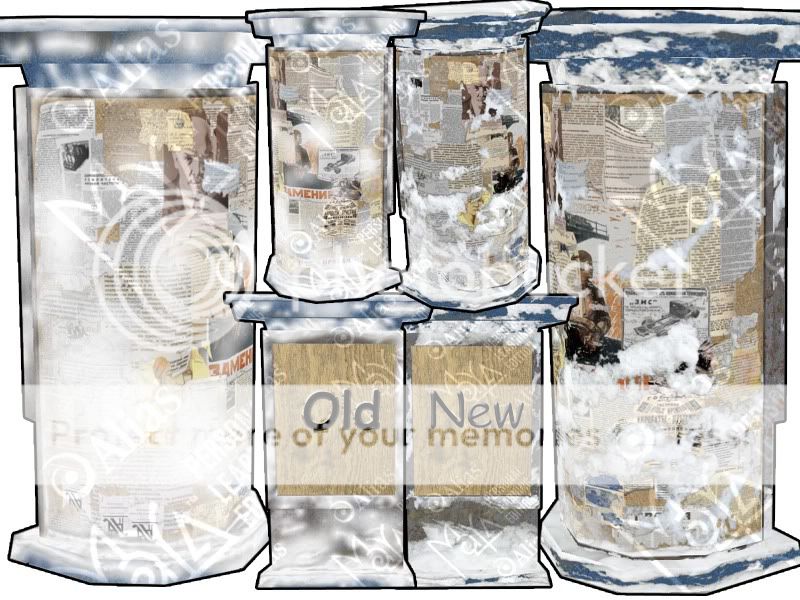
Sign Board Final - (Poly Count = 112)
Not exactly sure what this thing is called so I'm calling it a Sign Board for now. This is the only picture I could find of this object so I had to improvise the back part. I came up with a display window that will have a poster or ad on the board and a pane of glass in front. I didn't model the pane of glass or the poster to allow for some customization. This way I can have broken or unbroken glass, and any poster/ad I want.
To date I've made 50 static meshes for my mapping purposes but most are fairly simple objects that come in at 100 polys or less. Here's 3 of the more complicated static meshes I've finished recently:


Upvote
0
Good stuff as always here. Both the vehicle models are very nice, I might revisit the skins a little bit to make them a little duller, add some fire damage as if they were burned, but that's mainly just personal preference. The snow on the skins looks great. The baricades are looking nice too, keep it up.
Upvote
0