

We all know the situation: Someone takes Squad Leader, and proceeds to throw smoke in all the wrong places (or not at all). The result is often a really frustrating match, and probably lots of yelling. So, here's a few tips on how to use smoke. This is very general advice, and will adjust situationally, but hopefully this will give budding Squad Leaders some insight into how to best use thier smoke grenades.
Smoke in RO generally has two purposes: Concealment, and blinding the enemy. In many cases these are interchangable due to the generally small size of RO's maps. In real life, smoke barrages may be laid to allow tanks and infantry to manuever without being seen, but in RO, we're usually talking about crossing the street instead of crossing entire fields, and usually only have a few smoke grenades instead of smoke support from mortars, artillery, or tanks. So the use is somewhat limited. But how best to use it? Lets take a look at a couple scenerios of an advance:
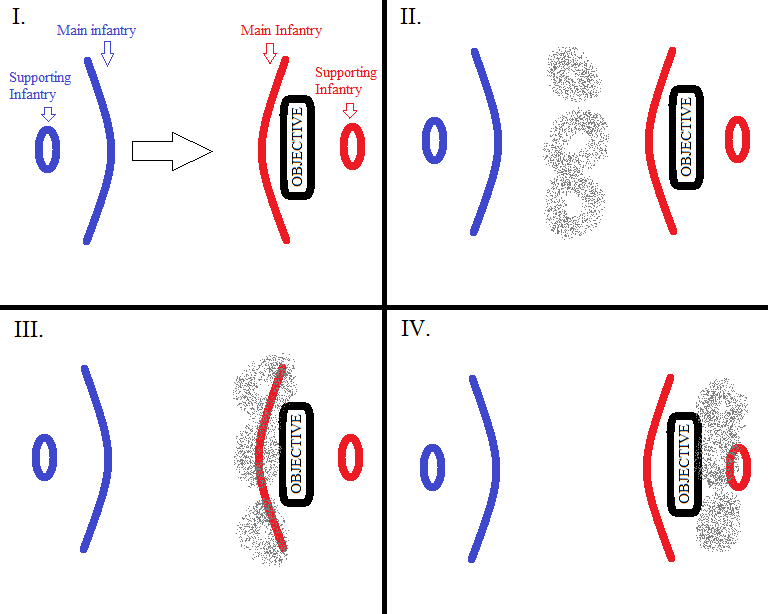
In the image above, you see two opposing forces in Panel I. The blue is friendly, the red is the enemy, who holds the objective. You have your main force of infantry, which is composed of Riflemen, Assault infantry (SMGs), Sapers, etc. You also have your supporting infantry, meaning your MGs, snipers, AT riflemen, etc. Generally on the advance, your main infantry body should be moving to take the objective, while the support gets into a good firing position and covers the advance. Obviously the above is a simplification of most maps, but it will serve our purposes here.
Now, what is the Squad Leader to do with his smoke grenades? Panels II through IV offer three basic choices, with the grey blotches representing smoke placement.
Panel II has the smoke placed in front of the objective and the enemy infantry. Many players do this because smoke is "concealment", and they're attempting to cover their advance.
Panel III has the smoke placed on the main enemy infantry force, the "front line trenches" if you will. Often this will mean smoke dropped directly on the objective. The goal here is probably to blind the main enemy infantry, and also block the enemy support weapons to cover the advance of the friendly infantry.
Panel IV. has the smoke placed BETWEEN the enemy main infantry and it's support weapons. The goal here is to neutralize the enemy support weapons.
Lets see how these various choices play out:
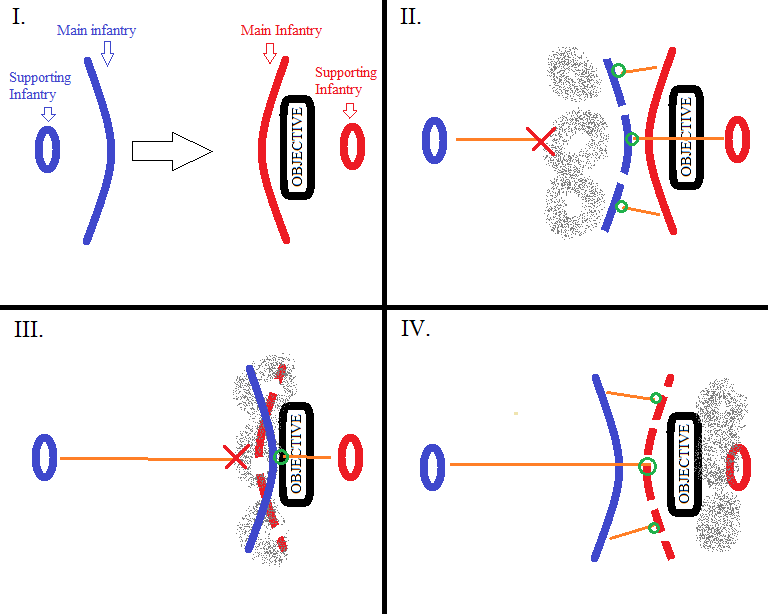
Panel II: Your main line infantry advanced up to the smoke, and in order to move forward to take the objective, they have to trudge on through it. What's waiting on the other side? A dug in enemy. And since your own smoke has blinded your own support weapons, the enemy is probably fresh and have no other targets other than your dudes stumbling through the fog into waiting MGs.
Panel III: The enemy infantry and support was unable to see most of your advance, so if your infantry is doing a good job, they probably got up to the objective. The problem is, once they get there, they can't see the enemy, and neither can the friendly support weapons, so they don't get to do much. This will often lead to confusion as the two main infantry groups bash it out in the smoke. Expect increased TKs and lots of blind nades. If you're lucky and the attackers push through the smoke, they run into the waiting enemy support. Not good. Better than Panel II because you have a chance of pushing back the main enemy, but taking the objective is still tougher than it has to be.
Panel IV. Now, with the enemy support weapons blinded, you are able to lay down fire from your own support weapons to suppress and kill the enemy infantry. Your own forces advance under supporting fire, and will also engage the enemy as well. Yes the enemy can still fire back at you, but they're taking the brunt of it and will be at a disadvantage. When you finally get to the enemy support, you'll have a better chance of destroying them, as you'll be stronger, and thier main infantry force is dimished and can't cover them. More importantly you've taken the objective. When you finally do get up there, it's probably a good idea to continue to throw smoke foward of the objective. Then you can turn the tables, and have the enemy stumbling out of the fog as they attempt to retake the point.
The Bottom Line: Often, the best use of smoke is used NOT as concealment, but to seperate enemy support elements from the rest of thier team. "Support" could mean a tank, a building with a particularly good field of fire, or some dug in LMGs and a sniper in a trench. It's not always as cut and dry as above, but if you start thinking about sectoring off the enemy, you can be a lot more effective in your smoke usage.
Hope this helps some people, thread is obviously open to discussion and further tips!
Smoke in RO generally has two purposes: Concealment, and blinding the enemy. In many cases these are interchangable due to the generally small size of RO's maps. In real life, smoke barrages may be laid to allow tanks and infantry to manuever without being seen, but in RO, we're usually talking about crossing the street instead of crossing entire fields, and usually only have a few smoke grenades instead of smoke support from mortars, artillery, or tanks. So the use is somewhat limited. But how best to use it? Lets take a look at a couple scenerios of an advance:
In the image above, you see two opposing forces in Panel I. The blue is friendly, the red is the enemy, who holds the objective. You have your main force of infantry, which is composed of Riflemen, Assault infantry (SMGs), Sapers, etc. You also have your supporting infantry, meaning your MGs, snipers, AT riflemen, etc. Generally on the advance, your main infantry body should be moving to take the objective, while the support gets into a good firing position and covers the advance. Obviously the above is a simplification of most maps, but it will serve our purposes here.
Now, what is the Squad Leader to do with his smoke grenades? Panels II through IV offer three basic choices, with the grey blotches representing smoke placement.
Panel II has the smoke placed in front of the objective and the enemy infantry. Many players do this because smoke is "concealment", and they're attempting to cover their advance.
Panel III has the smoke placed on the main enemy infantry force, the "front line trenches" if you will. Often this will mean smoke dropped directly on the objective. The goal here is probably to blind the main enemy infantry, and also block the enemy support weapons to cover the advance of the friendly infantry.
Panel IV. has the smoke placed BETWEEN the enemy main infantry and it's support weapons. The goal here is to neutralize the enemy support weapons.
Lets see how these various choices play out:
Panel II: Your main line infantry advanced up to the smoke, and in order to move forward to take the objective, they have to trudge on through it. What's waiting on the other side? A dug in enemy. And since your own smoke has blinded your own support weapons, the enemy is probably fresh and have no other targets other than your dudes stumbling through the fog into waiting MGs.
Panel III: The enemy infantry and support was unable to see most of your advance, so if your infantry is doing a good job, they probably got up to the objective. The problem is, once they get there, they can't see the enemy, and neither can the friendly support weapons, so they don't get to do much. This will often lead to confusion as the two main infantry groups bash it out in the smoke. Expect increased TKs and lots of blind nades. If you're lucky and the attackers push through the smoke, they run into the waiting enemy support. Not good. Better than Panel II because you have a chance of pushing back the main enemy, but taking the objective is still tougher than it has to be.
Panel IV. Now, with the enemy support weapons blinded, you are able to lay down fire from your own support weapons to suppress and kill the enemy infantry. Your own forces advance under supporting fire, and will also engage the enemy as well. Yes the enemy can still fire back at you, but they're taking the brunt of it and will be at a disadvantage. When you finally get to the enemy support, you'll have a better chance of destroying them, as you'll be stronger, and thier main infantry force is dimished and can't cover them. More importantly you've taken the objective. When you finally do get up there, it's probably a good idea to continue to throw smoke foward of the objective. Then you can turn the tables, and have the enemy stumbling out of the fog as they attempt to retake the point.
The Bottom Line: Often, the best use of smoke is used NOT as concealment, but to seperate enemy support elements from the rest of thier team. "Support" could mean a tank, a building with a particularly good field of fire, or some dug in LMGs and a sniper in a trench. It's not always as cut and dry as above, but if you start thinking about sectoring off the enemy, you can be a lot more effective in your smoke usage.
Hope this helps some people, thread is obviously open to discussion and further tips!
Last edited:
