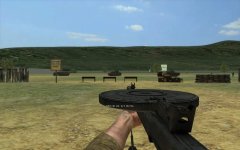
Strategy: You are not an MG, you are a hunter and a sniper carrying few rounds, make them count. Every shot you take can be traced back to your position, tankers see a momentary position indicator showing where a shot came from, wait until you have a shot with a high probability of damage or a kill before letting loose. You also have a highly visible muzzle flash, wait until he's not looking in your direction when targeting him head on. I'll often make single sporadic probing shots looking for weakness and to make a tanker move if he isn't in a position I can get a kill from, once he takes a solid hit or two, he'll often move and usually to your advantage.
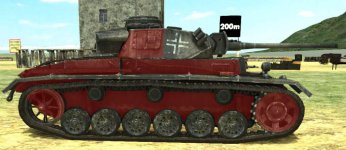
You can easily make the enemy's tanker's life frustrating, you can kill him from hiding and from long distance. 200-300m kills are common.
If you are stuck and can't find decent shots, harassing the tanker and taking out high value soft targets like enemy AT, MG or snipers is worthwhile. If you do your job right, you alone can counter an enemy tank and keep him close to his spawn, afraid and away from the action, freeing up your tank to wreak havoc. Unless the enemy AT has also read this guide....
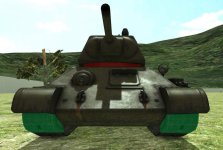
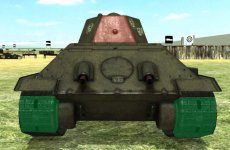
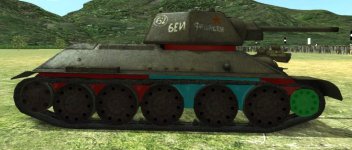
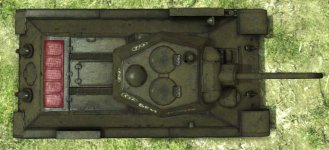
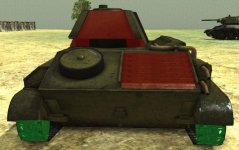
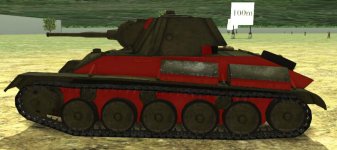
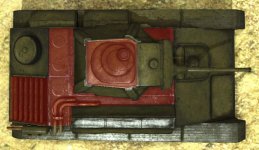
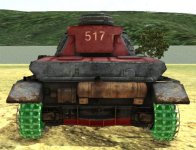
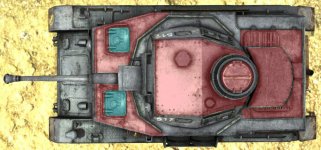
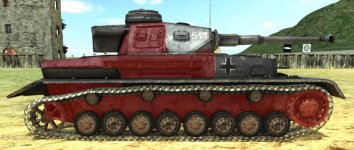
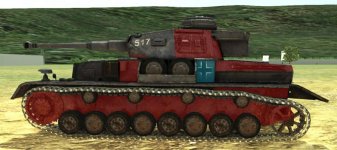
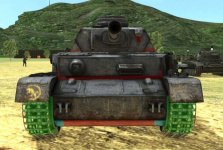
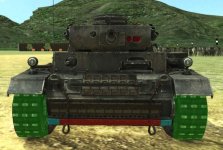
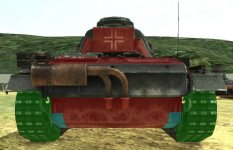
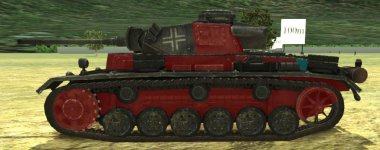
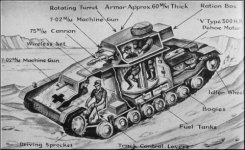
Damage: Tanks have a cumulative health, and specific armor plates also have their own health. Hitting a vulnerable area in the same spot continues to weaken it until you get catastrophic penetration and a kill. If the tank has been taking a beating and it's cumulative health is low, sometimes you can hit it pretty much anywhere and it will blow. Damaging the treads or transmission will not lead to a kill, once damaged, it can't be damaged any further, but it will immobilize them and make for an easier kill. In general, the targets inside of all tanks you are trying to punch holes in and hit are the engine, and the ammo stores and personnel under the turret. Think of it as an egg in the middle of the tank you are tying to crack. (see attached pic) The front drive wheel on all tanks will take tread damage, you can't tell you're doing damage as you hit it, but you are.
How do you know if you are doing any damage?
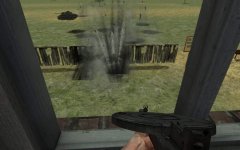
A "thunk" and sparks indicate a shell shattering and in almost all cases except transmission and tread, doing no damage. "ThunkThunk" is a ricocheted shell hitting the tank twice. A loud "CLANG" and a flash is what you are after. This indicates penetration and where ever you just hit, hit it again and again.
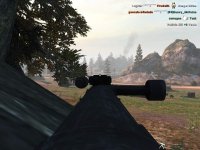
Position: For almost all soft spots, ANGLE IS EVERYTHING. Being close is helpful, but once you're past @ 50m, distance is immaterial. You can easily kill tanks with one or just a handful of shots at 200-300m if the angle is right. Try to be at 90 degrees to your target for shots to the side. That means you should plan where you want to be laterally on the map and also vertically. Being high and at 90 degrees to sloped armor on a turret gives you a much better chance on penetrating it. The angle is critical, I often find that I can penetrate in one spot and not in another just a half meter over. Once you know the soft spots where you should be able to penetrate, take probing shots and reposition until you do.
Leading: Because of the disabled client side hit detection, moving targets are a challenge. I double my normal lead and manage OK, especially on tanks since they're big. Hitting running infantry is a crap shoot, but always fun to blow someone in half.
TLDR – Shoot the red & blue bits.
All these spots have been confirmed by me and others as repeatable in game. I plan on updating the images as new spots are found, so feel free to post them up and I'll edit them in.
A huge thanks to nymets1104 whose map TankGunnery made this all possible. Download it here: http://forums.tripwireinteractive.com/showthread.php?t=103076&highlight=gunnery+range
Great videos:
General Sir Anthony CHM
http://forums.tripwireinteractive.com/showthread.php?t=104014
https://www.youtube.com/watch?v=voigVFdXwKc
Desert Ace
https://www.youtube.com/watch?v=Fv6bIanFJlo
Thanks also to Temesin
KaBoom!
You can easily make the enemy's tanker's life frustrating, you can kill him from hiding and from long distance. 200-300m kills are common.
If you are stuck and can't find decent shots, harassing the tanker and taking out high value soft targets like enemy AT, MG or snipers is worthwhile. If you do your job right, you alone can counter an enemy tank and keep him close to his spawn, afraid and away from the action, freeing up your tank to wreak havoc. Unless the enemy AT has also read this guide....
Damage: Tanks have a cumulative health, and specific armor plates also have their own health. Hitting a vulnerable area in the same spot continues to weaken it until you get catastrophic penetration and a kill. If the tank has been taking a beating and it's cumulative health is low, sometimes you can hit it pretty much anywhere and it will blow. Damaging the treads or transmission will not lead to a kill, once damaged, it can't be damaged any further, but it will immobilize them and make for an easier kill. In general, the targets inside of all tanks you are trying to punch holes in and hit are the engine, and the ammo stores and personnel under the turret. Think of it as an egg in the middle of the tank you are tying to crack. (see attached pic) The front drive wheel on all tanks will take tread damage, you can't tell you're doing damage as you hit it, but you are.
How do you know if you are doing any damage?
A "thunk" and sparks indicate a shell shattering and in almost all cases except transmission and tread, doing no damage. "ThunkThunk" is a ricocheted shell hitting the tank twice. A loud "CLANG" and a flash is what you are after. This indicates penetration and where ever you just hit, hit it again and again.
Position: For almost all soft spots, ANGLE IS EVERYTHING. Being close is helpful, but once you're past @ 50m, distance is immaterial. You can easily kill tanks with one or just a handful of shots at 200-300m if the angle is right. Try to be at 90 degrees to your target for shots to the side. That means you should plan where you want to be laterally on the map and also vertically. Being high and at 90 degrees to sloped armor on a turret gives you a much better chance on penetrating it. The angle is critical, I often find that I can penetrate in one spot and not in another just a half meter over. Once you know the soft spots where you should be able to penetrate, take probing shots and reposition until you do.
Leading: Because of the disabled client side hit detection, moving targets are a challenge. I double my normal lead and manage OK, especially on tanks since they're big. Hitting running infantry is a crap shoot, but always fun to blow someone in half.
TLDR – Shoot the red & blue bits.
All these spots have been confirmed by me and others as repeatable in game. I plan on updating the images as new spots are found, so feel free to post them up and I'll edit them in.
A huge thanks to nymets1104 whose map TankGunnery made this all possible. Download it here: http://forums.tripwireinteractive.com/showthread.php?t=103076&highlight=gunnery+range
Great videos:
General Sir Anthony CHM
http://forums.tripwireinteractive.com/showthread.php?t=104014
https://www.youtube.com/watch?v=voigVFdXwKc
Desert Ace
https://www.youtube.com/watch?v=Fv6bIanFJlo
Thanks also to Temesin
KaBoom!
Attachments
Last edited: