

Update 4/30/15:
This is a work in progress:
Introduction: When Killing Floor 2 first came out on early access the amount of servers available the first day was quite limited. I spent a while trying to be the first to click on an open server with no luck. In fact, some server owners reported their servers were crashing because more than 200 players would try to connect at the same time. Due to this I decided to attempt to host my own server so I could always find a spot to play and even modify the game settings to my liking. I had never hosted a server in the past and some of the technical jargon was above me, but I figured it out and am now happily managing my own server.
Overview: This guide is tailored to those like myself who only have a basic knowledge of computers. Please remember this as you go through this guide as there will possibly be errors or incorrect information. With that said, this only brushes the surface of hosting a server and there is much more to learn after following this guide. Still, at the end you should have a working server.
The demo server is setup on a spare computer running Windows. It is connected to the internet through a router with a basic home network setup.
Contents:
Chapter 1: Resources
Chapter 2: The Basics
Chapter 1: Resources
KF2 Dedicated Server Wiki - The Wiki is the goto source for setting up your server. You could essentially follow the guide there with little trouble. This guide, however, will explain in more detail parts that may be confusing to the basic user.
Chapter 2: The Basics
2-1 Configure Network Settings
The first item to take care of is to setup a Static IP for the computer you will host on. This is important because your home network may assign a different local IP address to the computer when it restarts and this will mess up the port forwarding we are going to setup next. This is a well documented process and a guide for your OS can be found at PortForwarding.com.
Once you have your Static IP configured you can move on to port forwarding. In order for others to access your server you will need to forward the appropriate ports on that computer. To do this you will need to access your router settings. Information on how to access your router setup page can be found at SetupRouter.com. Search for your specific router and follow the directions given.
When you gain access to your router settings you should be able to find a page for Port Forwarding. On my Linksys router it looks like this:
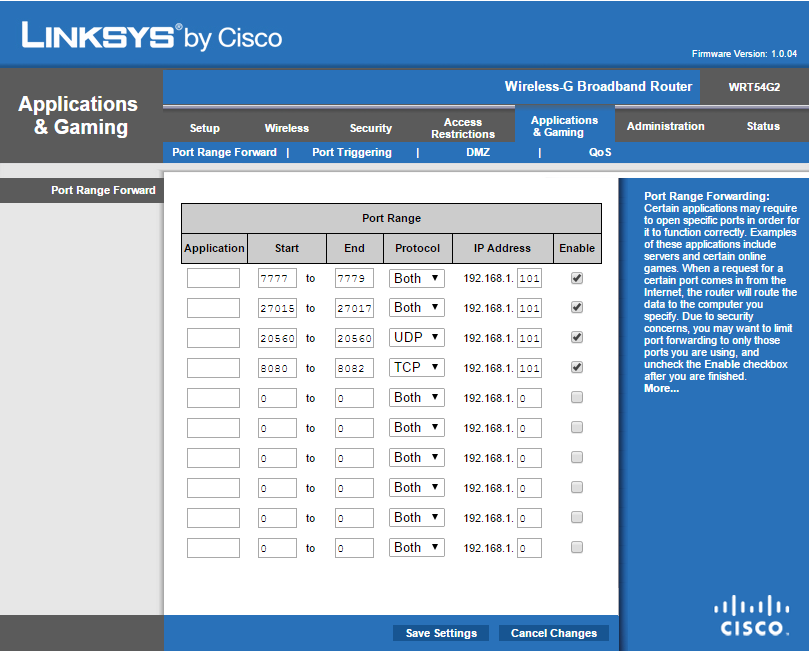
In my example you can see that my end value is a little higher than the start value. This is because I have set up for 2 servers to run on the same machine. If this is something you want to do as well, you can set the port forwarding up exactly like mine. Multiple server setup is covered later for those wanting to host 2+ servers.
2-2 Installing the Server Files
To install the server files you'll first need to download the SteamCMD Update Tool.
2-3 Configure Server Settings
When you install the server files it sets default values for items such as the server name and admin password. The following steps will explain where to change these values.
2-4 Starting Your Server
Your server is now ready to run and will be listed in the game browser. Simply navigate to the KF2Server.bat and double click to launch.
2-5 Creating Multiple Servers
Chapter 3: WebAdmin
WebAdmin is a browser tool that allows you to change game settings with a more friendly interface than the .ini files. Note the the page will only load if your server is running and WebAdmin is enabled. When on your home network you can connect with either the local IP address or the public. If you are away from your home network and want to check on the status of your server (unless it crashed) you can use the public IP to connect.
3-1 Enable and Connect
To enable WebAdmin you have to change one setting in the config files.
3-2 WebAdmin Features
WebAdmin is quite user friendly in my opinion. Here's a rundown of where the basic controls are located. The information in the top right corner of the screen will update automatically. The chat console displays at the bottom of every page and can be hidden or maximized. You can also chat with the players in your server with the console. Your messages will appear as Admin: Your Chat Here. The chat color is not changeable but the player name can be changed by creating a MultiAdmin login account, described later.
Current Game
Access Policy
Settings
Management Console
This allows you to enter console commands into the game just as if you were playing. Again, several features are disabled at this time.
3-3 Creating Multiple Login's (MultiAdmin)
MultiAdmin is a feature that allows you to create multiple login's to WebAdmin. Even if you will be the only user it will allow you to have a different login username and password than your game server. The process is very easy.
- Added 3-2 WebAdmin Features
- Added 3-3 Creating Multiple Login's (WebAdmin)
This is a work in progress:
Introduction: When Killing Floor 2 first came out on early access the amount of servers available the first day was quite limited. I spent a while trying to be the first to click on an open server with no luck. In fact, some server owners reported their servers were crashing because more than 200 players would try to connect at the same time. Due to this I decided to attempt to host my own server so I could always find a spot to play and even modify the game settings to my liking. I had never hosted a server in the past and some of the technical jargon was above me, but I figured it out and am now happily managing my own server.
Overview: This guide is tailored to those like myself who only have a basic knowledge of computers. Please remember this as you go through this guide as there will possibly be errors or incorrect information. With that said, this only brushes the surface of hosting a server and there is much more to learn after following this guide. Still, at the end you should have a working server.
The demo server is setup on a spare computer running Windows. It is connected to the internet through a router with a basic home network setup.
Contents:
Chapter 1: Resources
Chapter 2: The Basics
2-1 Configure Network Settings
2-2 Installing the Server Files
2-3 Configure Server Settings
2-4 Starting Your Server
TBD 2-5 Creating Multiple Servers
Chapter 3: WebAdmin2-2 Installing the Server Files
2-3 Configure Server Settings
2-4 Starting Your Server
TBD 2-5 Creating Multiple Servers
3-1 Turn On and Connect
3-2 WebAdmin Features
3-3 Creating Multiple Login's
Chapter 4: ServerActors3-2 WebAdmin Features
3-3 Creating Multiple Login's
TBD 4-1 What is a ServerActor?
TBD 4-2 Installing a ServerActor
TBD 4-2 Installing a ServerActor
Chapter 1: Resources
KF2 Dedicated Server Wiki - The Wiki is the goto source for setting up your server. You could essentially follow the guide there with little trouble. This guide, however, will explain in more detail parts that may be confusing to the basic user.
Chapter 2: The Basics
2-1 Configure Network Settings
The first item to take care of is to setup a Static IP for the computer you will host on. This is important because your home network may assign a different local IP address to the computer when it restarts and this will mess up the port forwarding we are going to setup next. This is a well documented process and a guide for your OS can be found at PortForwarding.com.
Once you have your Static IP configured you can move on to port forwarding. In order for others to access your server you will need to forward the appropriate ports on that computer. To do this you will need to access your router settings. Information on how to access your router setup page can be found at SetupRouter.com. Search for your specific router and follow the directions given.
When you gain access to your router settings you should be able to find a page for Port Forwarding. On my Linksys router it looks like this:
Spoiler!
- In the port range field you want the start and end to match these Ports (listed on the Wiki).
7777 - Both - Game Port, the main port the game will send connections over.
27015 - Both - Query Port, used to communicate with the Steam Master Server.
8080 - TCP - Web Admin Port, used to connect to your servers WebAdmin page.
20560 - UDP - Steam Port, unsure what it is used for but the Wiki has it listed. - You should also be given the option to select a Protocol. This will be either UDP, TCP, or both. Select the correct option using the list above.
- Finally, you want to specify the IP address of the computer you are hosting on. Earlier you set this up, so use that value.
In my example you can see that my end value is a little higher than the start value. This is because I have set up for 2 servers to run on the same machine. If this is something you want to do as well, you can set the port forwarding up exactly like mine. Multiple server setup is covered later for those wanting to host 2+ servers.
2-2 Installing the Server Files
To install the server files you'll first need to download the SteamCMD Update Tool.
- Extract the steamcmd.zip to a directory (C:\SteamCmd)
Make sure you create a specific folder for the extraction, not just C:\ - In the selected folder you should see an application called steamcmd. Run the application and wait for it to update.
- When the update is finished it will display Steam>. This is where you can now install the KF2 Server files.
- Login to the Steam server:
Code:
Steam>[COLOR="Cyan"]login anonymous[/COLOR] - Set the directory where you want your server files to be located. It is suggested to put them in the folder you created to run steamcmd. To do this:
You can change "KF2Server" to whatever you'd like.Code:
steam>[COLOR="cyan"]force_install_dir .\KF2Server\[/COLOR]
- Install the server files:
This will take a few minutes as the files are installed. I'm guessing that the 232130 is a code for the KF2 Dedicated Server files.Code:
Steam>[COLOR="cyan"]app_update 232130 validate[/COLOR]
- Exit steamcmd:
Code:
Steam>[COLOR="cyan"]quit[/COLOR]
2-3 Configure Server Settings
When you install the server files it sets default values for items such as the server name and admin password. The following steps will explain where to change these values.
- Navigate to C:\SteamCMD\KF2Server\
- Right click and edit the KF2Server.bat batch file. Go ahead and delete the admin password, we will set that up in the game configuration file instead.
Code:start .\Binaries\win64\kfserver kf-bioticslab
- Launch your server once to create the necessary config files by double clicking KF2Server.bat. Once it has finished (will only be a few seconds) go ahead and close the server window.
- Open C:\SteamCMD\KF2Server\KFGame\Config
This is where the bulk of your server settings are contained in .ini files. Your server runs off the ones that start with PCServer-. Use caution as to not edit any of the Default files. These would be used as backup in case one of your PCServer files became corrupted.
- Right click and edit PCServer-KFGame
In the 2nd section [Engine.AccessControl] is where you will set your admin password.
You can also set a password to join the game from here as well. These options are also available using WebAdmin which I'll show you how to activate later.Code:[Engine.AccessControl] IPPolicies=ACCEPT;* bAuthenticateClients=True bAuthenticateServer=True bAuthenticateListenHost=True MaxAuthRetryCount=3 AuthRetryDelay=5 [COLOR="Cyan"]AdminPassword=demoserver[/COLOR] GamePassword=
- Do a CTRL+F to find "ServerName". There is only one instance under [Engine.GameReplicationInfo].
I'm not sure what ShortName is used for but there doesn't seem to be a problem with leaving it as default. Again, this can be customized later in WebAdmin.Code:[Engine.GameReplicationInfo] [COLOR="Cyan"]ServerName=Guide Demo Server[/COLOR] ShortName=KFServer
2-4 Starting Your Server
Your server is now ready to run and will be listed in the game browser. Simply navigate to the KF2Server.bat and double click to launch.
2-5 Creating Multiple Servers
Chapter 3: WebAdmin
WebAdmin is a browser tool that allows you to change game settings with a more friendly interface than the .ini files. Note the the page will only load if your server is running and WebAdmin is enabled. When on your home network you can connect with either the local IP address or the public. If you are away from your home network and want to check on the status of your server (unless it crashed) you can use the public IP to connect.
3-1 Enable and Connect
To enable WebAdmin you have to change one setting in the config files.
- Navigate to C:\SteamCMD\kf2server\KFGame\Config\
- Right click and edit KFWeb.ini
- Enable WebAdmin by changing the value in bEnabled to true:
Code:[IpDrv.WebServer] Applications[0]=WebAdmin.KF2ServerAdmin Applications[1]=WebAdmin.KF2ImageServer ApplicationPaths[0]=/ServerAdmin ApplicationPaths[1]=/images ListenPort=8080 MaxConnections=18 ExpirationSeconds=86400 [COLOR="cyan"]bEnabled=true[/COLOR] - Restart your server.
- Using your favorite browser type in your local IP address for the host computer and the port (ex. 192.168.1.101:8080)
Your local IP address is the one you created when you made a static IP. The default port is 8080. - Login with the username "Admin" and the password you set earlier in PCServer-KFGame.ini.
3-2 WebAdmin Features
WebAdmin is quite user friendly in my opinion. Here's a rundown of where the basic controls are located. The information in the top right corner of the screen will update automatically. The chat console displays at the bottom of every page and can be hidden or maximized. You can also chat with the players in your server with the console. Your messages will appear as Admin: Your Chat Here. The chat color is not changeable but the player name can be changed by creating a MultiAdmin login account, described later.
Current Game
- Server Info: This page displays your servers current stats. Very straight froward. It does not automatically refresh.
- Change Map: Access to the game type and map selection. Click "Change Game" when ready.
- Players: From here you can see detailed info about your players. This is also where you can kick, ban, and mute players.
Access Policy
- Passwords: As mentioned earlier, you can change the game and admin password from WebAdmin and this is where. When you submit these settings it will overwrite the value in PCServer-KFGame.ini as appropriate.
Settings
- General: This is where the bulk of your game settings are located. There are links along the top of the page to navigate to various settings.
Server Information allows you to change the server name.Some of the settings are currently disabled by Tripwire even though you can set values. For example, Map Voting and Kick Voting are options, but do not yet work in the servers.
Game is where you can set the difficulty and length. Team Collision is whether or not players can run into or through one another.
- GameTypes: We only have one game type right now, Survival.
End of Game Delay is the amount of seconds after a win/loss before the game restarts.
Game Start Delay is the time in seconds before a game starts once all players have ready up.
Ready Up Delay is the time in seconds after 50% or more(I believe) of the players ready up.
Pickups enables or disables in game pickups (weapons, ammo, kevlar). - Map Cycles: From here you can determine the automatic rotation of your maps. Simply drag and drop, then save. You can add the same map twice if, for example, you wanted to rotate maps twice in a row before moving on to the next.
Management Console
This allows you to enter console commands into the game just as if you were playing. Again, several features are disabled at this time.
3-3 Creating Multiple Login's (MultiAdmin)
MultiAdmin is a feature that allows you to create multiple login's to WebAdmin. Even if you will be the only user it will allow you to have a different login username and password than your game server. The process is very easy.
- Shut down your server.
- Navigate to C:\SteamCMD\KF2Server\KFGame\Config
- Open KFWebAdmin.ini and add the following under [WebAdmin.WebAdmin]:
Code:AuthenticationClass=WebAdmin.MultiWebAdminAuth - Restart your server.
- Login to WebAdmin using your default credentials (username=Admin, password set in PCServer-KFGame.ini)
- You will see a new menu called Administrators near the bottom of the navigation pane. Click 'Create Administrator' to set the permissions of the new admin. You can also edit the default Admin login to disable it (I didn't like that anybody would be able to attempt to use that as a login).
Last edited: