

Hello. If you read my first guide and learned how to use the udk/sdk through the video tutorials I linked, then I think you are ready for this one!
This tutorial will teach you how to place an array of objects down such as pylons. It can help you place a lot of pylons, emitters, or static meshes in a nice array. The tutorial will be using an external program called the UDKLayoutTool. It is able to layout randomized objects but for this tutorial we will be using an array. An array is basically objects arranged in rows and columns. Think of a multiplication table. It has 10 rows and 10 columns with numbers in each box. That is an array.
First lets download the tool. You will need winrar or 7z to extract the contents.
Here is my large terrain. I will be placing down pylons for bot support. I don't want to place down pylons manually. That sucks.
Lets measure out the terrain. Go to the top viewport and drag with your middle mouse button to use the ruler tool. My terrain is 40000 by 40000. Pylons are 4000 by 4000 so I need 100 of them. Am I really going to place 100 down manually?
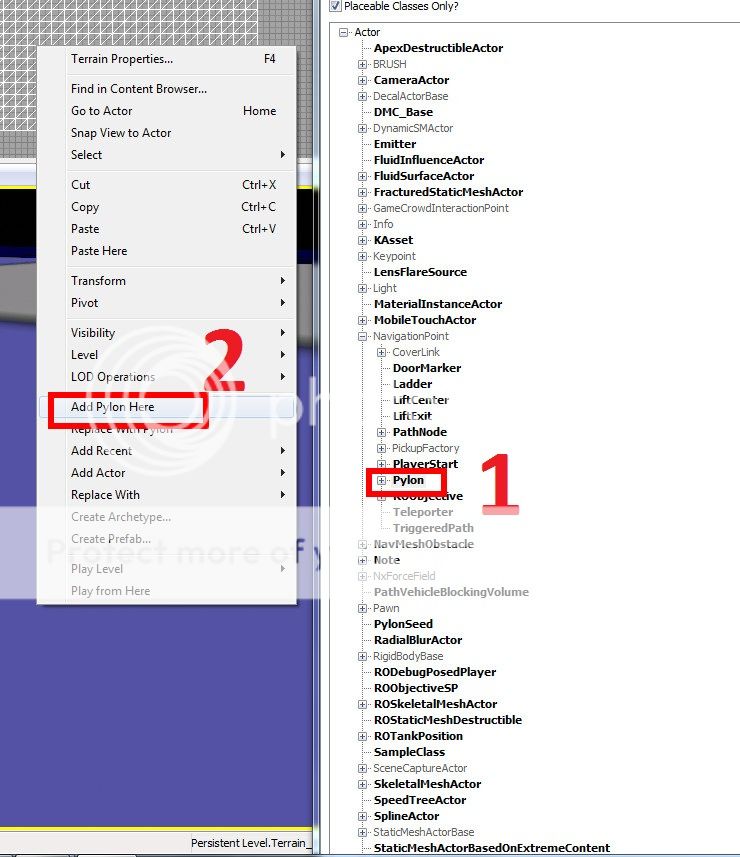
First open up that content browser and and select (1) pylon. Then right click and (2) Add Pylon Here. 99 more to go...? Nope. Don't forget we are using the UDK Layout Tool today. So select your pylon and right click and cut or you can use ctrl+x. We do this because the UDK Layout Tool generates objects based on what you just copied or cut. Then once it generates objects it places it in your clipboard. This means you can paste your new array in your map once you generate something.
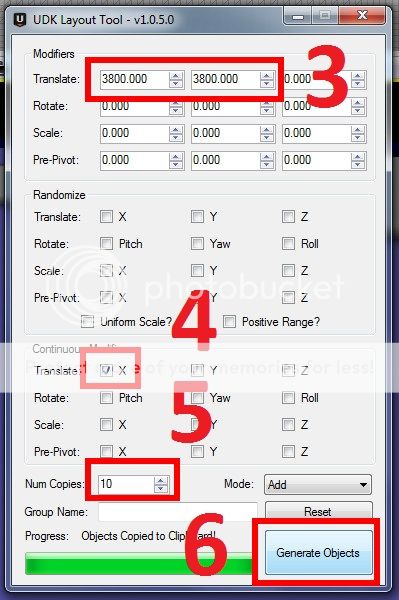
Open up the UDK Layout Tool and we are going to change some parameters. The first row (3) is the translate input. It controls how much you are going to translate in the x y and z direction. So because the pylons are 4000 by 4000, we'd want to translate them 4000 in each direction so they fit perfectly right? Unfortunately that means they won't overlap and that is required for pylons. So I used 3800.
Next you only want to translate in one direction at a time. If you use both x and y then you will end up with a diagonal instead of a straight line. So only check (4) X under the Continuous Modifier for Translate.
You want 10 copies because the x by y of your terrain 40000 by 40000. We are translating each object by 3800 so 10 is a good number.
Hit (6) generate objects.
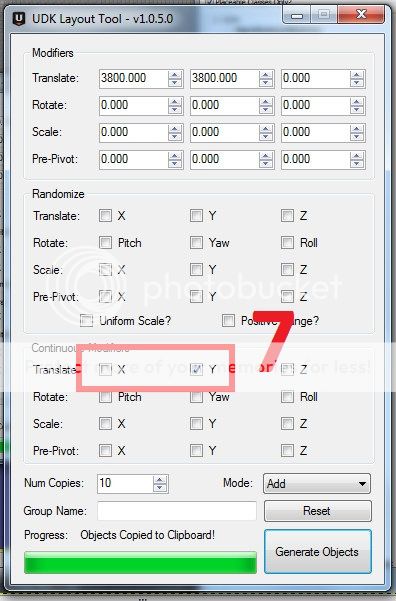
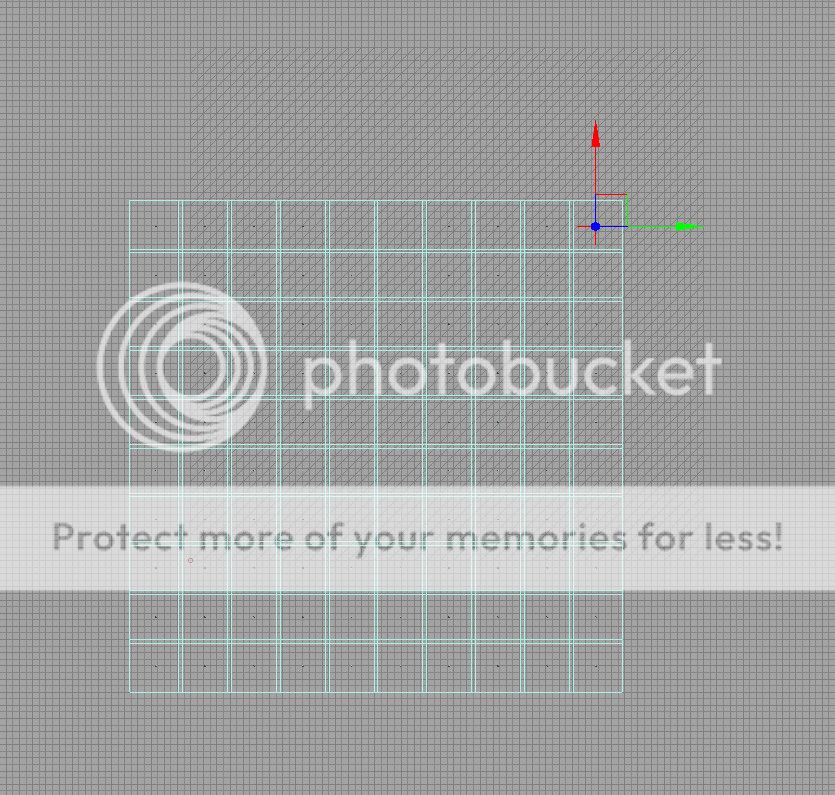
Remember we only generated 10 pylons in the X direction translated 3800 for each object. We still need the y direction. We can copy it 10 times in our map to do 100 but it is easier to use the UDK Layout Tool. Remember that the 10 pylons translated by 3800 in the X direction is in our clipboard and the UDK Layout Tool generates objects based on what is in your clipboard.
So with that in mind, all your settings are correct except for the continuous modifier. You will want to uncheck (7) X and check Y. Now it will copy the row of pylons you made 10 times in the Y direction.
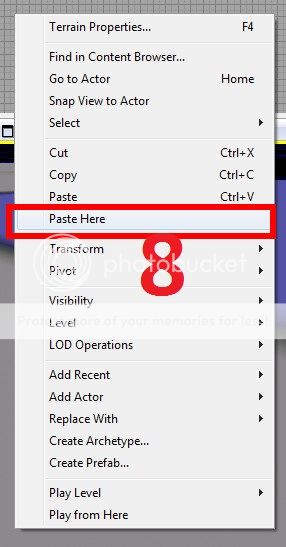
Next right click on your terrain and select (8) paste here. Don't select paste, that means it could go anywhere on your map and we don't want to go around searching for it.
Now use the top viewport to move the pylon array and center it on your playable area.
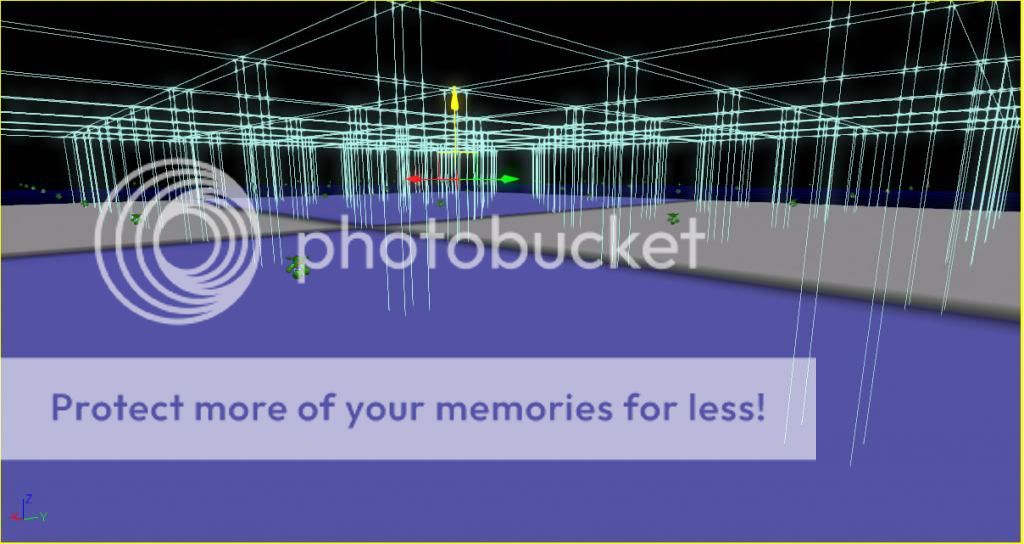
Use the 3D viewport to drag the array into the air or along the positive Z axis. We want the pylons to be floating for the next step.
See how the pylons are floating? We want them to be higher than any hill you created. So press "End" key and they will all drop to the ground conforming to your terrain. You should do this step before you make buildings. We don't want pylons sitting on top of buildings. They have to be on the ground.
One other thing about pylons, make sure you don't go overboard and make too many pylons. You need just enough to cover your playing area. If you have too many, then it will take longer to build paths.
One last thing is when you build paths for the first time, it will take a few hours. The next few times will be shorter because it just modifies the paths you built the first time.
This tutorial will teach you how to place an array of objects down such as pylons. It can help you place a lot of pylons, emitters, or static meshes in a nice array. The tutorial will be using an external program called the UDKLayoutTool. It is able to layout randomized objects but for this tutorial we will be using an array. An array is basically objects arranged in rows and columns. Think of a multiplication table. It has 10 rows and 10 columns with numbers in each box. That is an array.
First lets download the tool. You will need winrar or 7z to extract the contents.
Here is my large terrain. I will be placing down pylons for bot support. I don't want to place down pylons manually. That sucks.
Spoiler!
Lets measure out the terrain. Go to the top viewport and drag with your middle mouse button to use the ruler tool. My terrain is 40000 by 40000. Pylons are 4000 by 4000 so I need 100 of them. Am I really going to place 100 down manually?
Spoiler!
First open up that content browser and and select (1) pylon. Then right click and (2) Add Pylon Here. 99 more to go...? Nope. Don't forget we are using the UDK Layout Tool today. So select your pylon and right click and cut or you can use ctrl+x. We do this because the UDK Layout Tool generates objects based on what you just copied or cut. Then once it generates objects it places it in your clipboard. This means you can paste your new array in your map once you generate something.
Spoiler!
Open up the UDK Layout Tool and we are going to change some parameters. The first row (3) is the translate input. It controls how much you are going to translate in the x y and z direction. So because the pylons are 4000 by 4000, we'd want to translate them 4000 in each direction so they fit perfectly right? Unfortunately that means they won't overlap and that is required for pylons. So I used 3800.
Next you only want to translate in one direction at a time. If you use both x and y then you will end up with a diagonal instead of a straight line. So only check (4) X under the Continuous Modifier for Translate.
You want 10 copies because the x by y of your terrain 40000 by 40000. We are translating each object by 3800 so 10 is a good number.
Hit (6) generate objects.
Spoiler!
Remember we only generated 10 pylons in the X direction translated 3800 for each object. We still need the y direction. We can copy it 10 times in our map to do 100 but it is easier to use the UDK Layout Tool. Remember that the 10 pylons translated by 3800 in the X direction is in our clipboard and the UDK Layout Tool generates objects based on what is in your clipboard.
So with that in mind, all your settings are correct except for the continuous modifier. You will want to uncheck (7) X and check Y. Now it will copy the row of pylons you made 10 times in the Y direction.
Spoiler!
Next right click on your terrain and select (8) paste here. Don't select paste, that means it could go anywhere on your map and we don't want to go around searching for it.
Spoiler!
Now use the top viewport to move the pylon array and center it on your playable area.
Spoiler!
Use the 3D viewport to drag the array into the air or along the positive Z axis. We want the pylons to be floating for the next step.
Spoiler!
See how the pylons are floating? We want them to be higher than any hill you created. So press "End" key and they will all drop to the ground conforming to your terrain. You should do this step before you make buildings. We don't want pylons sitting on top of buildings. They have to be on the ground.
One other thing about pylons, make sure you don't go overboard and make too many pylons. You need just enough to cover your playing area. If you have too many, then it will take longer to build paths.
One last thing is when you build paths for the first time, it will take a few hours. The next few times will be shorter because it just modifies the paths you built the first time.
