

http://wiki.tripwireinteractive.com/index.php/Red_Orchestra_2:_Heroes_Of_Stalingrad/LevelDesign
THIS IS CURRENTLY UNDER CONSTRUCTION AND WILL BE UPDATED DAILY BY TW DEVS UNTIL ITS COMPLETE.
This thread is to explain some of the basic functionality that will help you get your map up and running. For basic or advanced UE3 editor tutorials or questions refer to the Unreal Developer Network. This thread is for explaining Red Orchestra 2 related setups and actors.
Spawning
ROVolumePlayerStartGroup - This volume is used to identify start locations for each team. Ideally you will want to have the same number of player starts as the max player load for the team. For example in a 8v8 each spawn location should have at least 8 spawns locations. You MUST set at LEAST the ROSpawnCameraActor in the volume properties. You will most likely want to use spawn protection volumes as well. Roles in the WorldInfo must be set in order to spawn.
If you split 32 spawns between 2 locations, all 32 people will spawn in the 1st spawn. If there is not enough spawns for all 32 they will start spawning inside of each other.
ROSpawnCameraActor - An actor that is used as a POV for when a player is selecting a spawn location. A reference of this actor should be associated with the ROVolumePlayerStartGroup.
ROSpawnProtectionVolume - This is a volume that represents the bounds of the spawn protection. A reference of this actor should be associated with the ROVolumePlayerStartGroup.
ROVolumeNoArtillery - This volume is used to disallow placement of artillery markers. Generally speaking so the area in front of a spawn protection volume doesn't get spammed with artillery if it happens to be an isolated route.
ROPlayerStart - This Navigation actor is used to identify where players will spawn. Use the rotation gizmo to orient the player start in the direction the players should be heading. Unchecking the bPrimaryStart in the properties of the ROPlayerStart will define the ROPlayerStart as a squad leader spawn location.
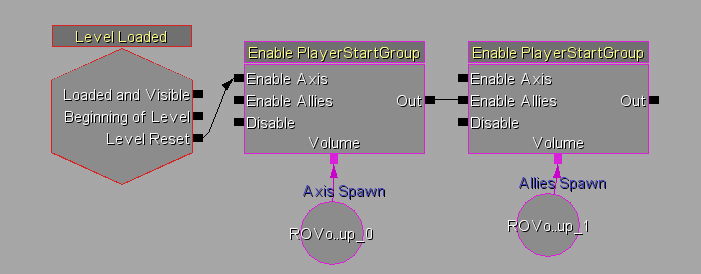
EnablePlayerStartGroup - This is a Kismet action that will set the state of a ROVolumePlayerStartGroup.
Roles

To add new roles to your level. go into the world info and add a ROMapInfo (under 'My Map Info'
Roles are broken down into the Team Leader (Commander), squader leader and fire team members. There can only be 10 people in a squad and only 10 squads.
Minimum Players - This determines at what point the squad/fireteam will become active based on how many people are in the server.
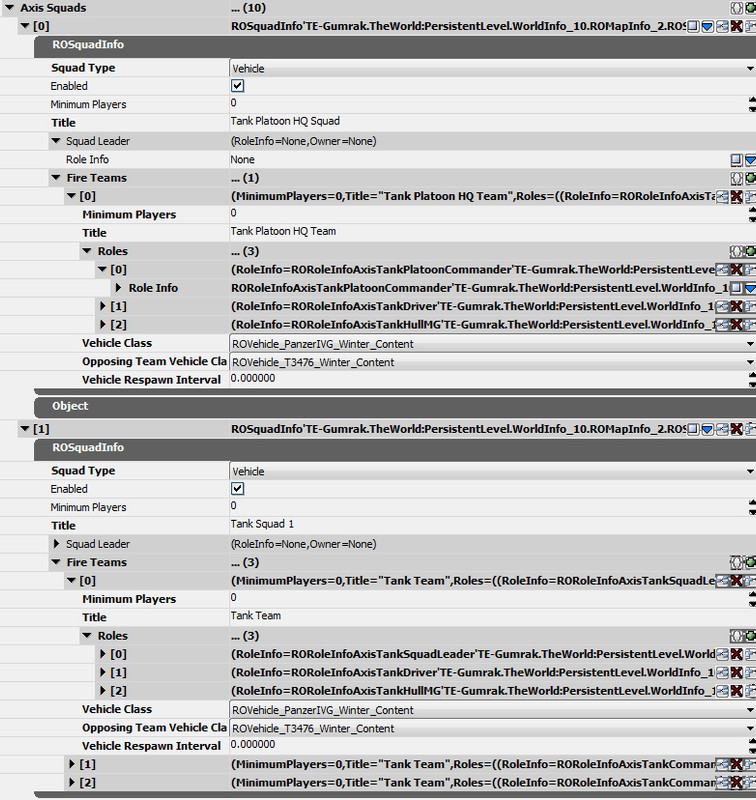
Tank roles are signifanctly different than infantry roles. Each fireteam is a new tank. The Tank Platoon Commander does not go in the Team Leader spot. The Tank Platoon Commander must be in a squad like the rest of the tanks.
Since each fireteam is a new tank - the roles for tank commander, tank driver and tank hull mg must be added.
Squad type must be set to Vehicle along with the Vehicle Class and the Opposing Team Vehicle Class.
Objectives
Territory Type Objectives
Using the ROObjective actor you can assign a ROPlaceable Volume in the 'Obj Volume' field. This will allow you to enable/activate/check status in kismet.
Make sure to enable the objectives you want at level reset by using the 'Level Reset' kismet action.
Obj Index - 0-99 number used to ID the objective order of enable objectives. These number do not need to be unique.
Obj Rep Index - A 0-64 number used for replication of the objective. This number must be unique for each objective.
1> Place a ROFixedMGSpawnPoint at the location you'd like to have a fixed MG at
NOTE: Actor -> Note -> ROSkeletalMeshSpawnPoint -> ROFixedMGSpawnPoint
2> Select either the Maxim of the MG34 skeletalmesh from the content browser.
MG34:
SkeletalMesh'WP_3rd_Master.Mesh.MG34_Tripod_3rd_Master'
Maxim:
SkeletalMesh'WP_3rd_Master.Mesh.Maxim_3rd_Master'
3> Open the properties of the ROFixedMGSpawnPoint and add the skeletalmesh from the content browser and add it to the field in the ROFixedMGSpawnPoint. That will give you a visual aid in placing the actual FMG.
NOTE: ROFixedMGSpawnPoint Properties -> ROSkeletalMeshSpawnPoint -> PreviewMesh -> Skeletal Mesh
3b> (OPTIONAL) The ROFixedMGSpawnPoint has another field called Yaw Limit Override and Pitch Limit Override. The default value are based on the actual Yaw and Pitch capabilities of the weapon historically. However, if you are not happy with those values you can add your own values knowing you are deviating from the actual capabilities of the weapon.
4> In Kismet, paste the following in.
On the ActorFactory EX, connect the SPAWN POINT connection(s) to the ROSkeletalMeshSpawnPoint you placed in your level.
NOTE: The reason we destroy the fixed MGs is because no more than one FMG will spawn at a location. When the map restarts, we always want fresh equipment in the field.
IMPORTANT: Do NOT destroy the spawn location(s) but rather the object that represents the fixed MG in Kismet instead. I have called it FMG_RussianA and FMG_RussianB in my example.
The Spawn Count (ActorFactoryEX -> SeqAct_ActorFactory -> Spawn Count) section allows for random selection a spawn location when the number is less than the total number of attached spawn locations.
That should get you going with fixed MGs.
Map Bounds/Overhead Map
THIS IS CURRENTLY UNDER CONSTRUCTION AND WILL BE UPDATED DAILY BY TW DEVS UNTIL ITS COMPLETE.
This thread is to explain some of the basic functionality that will help you get your map up and running. For basic or advanced UE3 editor tutorials or questions refer to the Unreal Developer Network. This thread is for explaining Red Orchestra 2 related setups and actors.
Spawning
Infantry Spawning
Spoiler!
ROVolumePlayerStartGroup - This volume is used to identify start locations for each team. Ideally you will want to have the same number of player starts as the max player load for the team. For example in a 8v8 each spawn location should have at least 8 spawns locations. You MUST set at LEAST the ROSpawnCameraActor in the volume properties. You will most likely want to use spawn protection volumes as well. Roles in the WorldInfo must be set in order to spawn.
If you split 32 spawns between 2 locations, all 32 people will spawn in the 1st spawn. If there is not enough spawns for all 32 they will start spawning inside of each other.
ROSpawnCameraActor - An actor that is used as a POV for when a player is selecting a spawn location. A reference of this actor should be associated with the ROVolumePlayerStartGroup.
ROSpawnProtectionVolume - This is a volume that represents the bounds of the spawn protection. A reference of this actor should be associated with the ROVolumePlayerStartGroup.
ROVolumeNoArtillery - This volume is used to disallow placement of artillery markers. Generally speaking so the area in front of a spawn protection volume doesn't get spammed with artillery if it happens to be an isolated route.
ROPlayerStart - This Navigation actor is used to identify where players will spawn. Use the rotation gizmo to orient the player start in the direction the players should be heading. Unchecking the bPrimaryStart in the properties of the ROPlayerStart will define the ROPlayerStart as a squad leader spawn location.
EnablePlayerStartGroup - This is a Kismet action that will set the state of a ROVolumePlayerStartGroup.
Tank Spawning
Spoiler!
Spawning tanks is similar to spawning players. The main difference is using a ROVolumePlayerStartGroupTankCrew. You must have tank roles specified for the team you're trying to spawn. Only tanks can spawn in this volume.
When setting up the squads for tanks, specifically tank only, do not use the squadleader nor the commander slots in the WorldInfo role section for tank roles. Instead, make a squad, then a fire team then add a tank squadleader, a hull machine gunner, and a driver in the first fire team. Make a new fire team then add a tank commander, hull machine gunner, and driver. Typically, we do not assign more than 3 tank teams to a particular squad excluding the Tank Squad Leader. The Tank Platoon Commander role should be used in a squad and fire team of it's own.
When setting up the squads for tanks, specifically tank only, do not use the squadleader nor the commander slots in the WorldInfo role section for tank roles. Instead, make a squad, then a fire team then add a tank squadleader, a hull machine gunner, and a driver in the first fire team. Make a new fire team then add a tank commander, hull machine gunner, and driver. Typically, we do not assign more than 3 tank teams to a particular squad excluding the Tank Squad Leader. The Tank Platoon Commander role should be used in a squad and fire team of it's own.
Role Selection Technical Info
Spoiler!
The UI for squad selection only supports 10 squad members including the squad leader. There is a limit of 12 squads total per team. The commander is not considered a squad.
Roles for Countdown MUST be mirrored between the two teams. This is to avoid issues with players getting the wrong class when teams switch between round. Use the console command 'CountdownCheckRoles' to see if your roles match up.
Roles for Countdown MUST be mirrored between the two teams. This is to avoid issues with players getting the wrong class when teams switch between round. Use the console command 'CountdownCheckRoles' to see if your roles match up.
Territory Roles
Spoiler!
To add new roles to your level. go into the world info and add a ROMapInfo (under 'My Map Info'
Roles are broken down into the Team Leader (Commander), squader leader and fire team members. There can only be 10 people in a squad and only 10 squads.
Minimum Players - This determines at what point the squad/fireteam will become active based on how many people are in the server.
Countdown Roles
Spoiler!
Countdown roles are set up similiarly to territory roles. The major thing to keep in mind that the roles must be mirroed between Axis and Allies. This is to insure no issues when the team swap happens between rounds.
FireFight Roles
Spoiler!
This determines the roles that will be aviliable for Fire Fight. There only needs to be one of each class for each team in order for them to show up in the class selection menu.
Tank Roles/Squads
Spoiler!
Tank roles are signifanctly different than infantry roles. Each fireteam is a new tank. The Tank Platoon Commander does not go in the Team Leader spot. The Tank Platoon Commander must be in a squad like the rest of the tanks.
Since each fireteam is a new tank - the roles for tank commander, tank driver and tank hull mg must be added.
Squad type must be set to Vehicle along with the Vehicle Class and the Opposing Team Vehicle Class.
Territory Type Objectives
Spoiler!
Using the ROObjective actor you can assign a ROPlaceable Volume in the 'Obj Volume' field. This will allow you to enable/activate/check status in kismet.
Make sure to enable the objectives you want at level reset by using the 'Level Reset' kismet action.
Obj Index - 0-99 number used to ID the objective order of enable objectives. These number do not need to be unique.
Obj Rep Index - A 0-64 number used for replication of the objective. This number must be unique for each objective.
Destructible Objectives
RadiosSetting up Radios
Fixed MGs
Spoiler!
1> Place a ROFixedMGSpawnPoint at the location you'd like to have a fixed MG at
NOTE: Actor -> Note -> ROSkeletalMeshSpawnPoint -> ROFixedMGSpawnPoint
2> Select either the Maxim of the MG34 skeletalmesh from the content browser.
MG34:
SkeletalMesh'WP_3rd_Master.Mesh.MG34_Tripod_3rd_Master'
Maxim:
SkeletalMesh'WP_3rd_Master.Mesh.Maxim_3rd_Master'
3> Open the properties of the ROFixedMGSpawnPoint and add the skeletalmesh from the content browser and add it to the field in the ROFixedMGSpawnPoint. That will give you a visual aid in placing the actual FMG.
NOTE: ROFixedMGSpawnPoint Properties -> ROSkeletalMeshSpawnPoint -> PreviewMesh -> Skeletal Mesh
3b> (OPTIONAL) The ROFixedMGSpawnPoint has another field called Yaw Limit Override and Pitch Limit Override. The default value are based on the actual Yaw and Pitch capabilities of the weapon historically. However, if you are not happy with those values you can add your own values knowing you are deviating from the actual capabilities of the weapon.
4> In Kismet, paste the following in.
Spoiler!
Begin Object Class=SeqVar_Named Name=SeqVar_Named_5
ExpectedType=Class'Engine.SeqVar_Object'
FindVarName="FMG_RussianA"
ObjInstanceVersion=1
ParentSequence=Sequence'Main_Sequence'
ObjPosX=2160
ObjPosY=-1608
ObjColor=(B=255,G=0,R=255,A=255)
DrawWidth=32
DrawHeight=32
Name="SeqVar_Named_5"
ObjectArchetype=SeqVar_Named'Engine.Default__SeqVar_Named'
End Object
Begin Object Class=SeqVar_Named Name=SeqVar_Named_4
ExpectedType=Class'Engine.SeqVar_Object'
FindVarName="FMG_RussianB"
ObjInstanceVersion=1
ParentSequence=Sequence'Main_Sequence'
ObjPosX=2088
ObjPosY=-1656
ObjColor=(B=255,G=0,R=255,A=255)
DrawWidth=32
DrawHeight=32
Name="SeqVar_Named_4"
ObjectArchetype=SeqVar_Named'Engine.Default__SeqVar_Named'
End Object
Begin Object Class=SeqVar_Object Name=SeqVar_Object_60
VarName="FMG_RussianB"
ObjInstanceVersion=1
ParentSequence=Sequence'Main_Sequence'
ObjPosX=2544
ObjPosY=-1504
DrawWidth=32
DrawHeight=32
Name="SeqVar_Object_60"
ObjectArchetype=SeqVar_Object'Engine.Default__SeqVar_Object'
End Object
Begin Object Class=SeqVar_Object Name=SeqVar_Object_59
ObjValue=ROFixedMGSpawnPoint'ROFixedMGSpawnPoint_6'
ObjInstanceVersion=1
ParentSequence=Sequence'Main_Sequence'
ObjPosX=2336
ObjPosY=-1536
DrawWidth=32
DrawHeight=32
Name="SeqVar_Object_59"
ObjectArchetype=SeqVar_Object'Engine.Default__SeqVar_Object'
End Object
Begin Object Class=SeqVar_Object Name=SeqVar_Object_58
VarName="FMG_RussianA"
ObjInstanceVersion=1
ParentSequence=Sequence'Main_Sequence'
ObjPosX=2448
ObjPosY=-1528
DrawWidth=32
DrawHeight=32
Name="SeqVar_Object_58"
ObjectArchetype=SeqVar_Object'Engine.Default__SeqVar_Object'
End Object
Begin Object Class=SeqVar_Object Name=SeqVar_Object_57
ObjValue=ROFixedMGSpawnPoint'ROFixedMGSpawnPoint_0'
ObjInstanceVersion=1
ParentSequence=Sequence'Main_Sequence'
ObjPosX=2392
ObjPosY=-1592
DrawWidth=32
DrawHeight=32
Name="SeqVar_Object_57"
ObjectArchetype=SeqVar_Object'Engine.Default__SeqVar_Object'
End Object
Begin Object Class=SeqAct_ActorFactoryEx Name=SeqAct_ActorFactoryEx_1
Begin Object Class=ROActorFactoryFixedMG Name=ROActorFactoryFixedMG_1
FixedMGClass=Class'ROGameContent.ROTurret_Maxim_HMG'
Name="ROActorFactoryFixedMG_1"
ObjectArchetype=ROActorFactoryFixedMG'ROGame.Default__ROActorFactoryFixedMG'
End Object
Factory=ROActorFactoryFixedMG'ROActorFactoryFixedMG_1'
SpawnCount=2
InputLinks(0)=(DrawY=-1730,OverrideDelta=15)
InputLinks(1)=(DrawY=-1707,OverrideDelta=38)
InputLinks(2)=(DrawY=-1684,OverrideDelta=61)
InputLinks(3)=(DrawY=-1661,OverrideDelta=84)
OutputLinks(0)=(DrawY=-1730,OverrideDelta=15)
OutputLinks(1)=(DrawY=-1707,OverrideDelta=38)
OutputLinks(2)=(DrawY=-1684,OverrideDelta=61)
OutputLinks(3)=(LinkDesc="Spawned 2",DrawY=-1661,OverrideDelta=84)
VariableLinks(0)=(LinkedVariables=(SeqVar_Object'SeqVar_Object_57',SeqVar_Object'SeqVar_Object_59'),DrawX=2415,OverrideDelta=16)
VariableLinks(1)=(LinkedVariables=(SeqVar_Object'SeqVar_Object_58'),DrawX=2485,OverrideDelta=78)
VariableLinks(2)=(ExpectedType=Class'Engine.SeqVar_Object',LinkedVariables=(SeqVar_Object'SeqVar_Object_60'),LinkDesc="Spawned 2",bWriteable=True,MinVars=0,DrawX=2563,OverrideDelta=156)
ObjInstanceVersion=1
ParentSequence=Sequence'Main_Sequence'
ObjPosX=2376
ObjPosY=-1768
DrawWidth=234
DrawHeight=155
Name="SeqAct_ActorFactoryEx_1"
ObjectArchetype=SeqAct_ActorFactoryEx'Engine.Default__SeqAct_ActorFactoryEx'
End Object
Begin Object Class=SeqAct_Destroy Name=SeqAct_Destroy_1
InputLinks(0)=(DrawY=-1742,OverrideDelta=11)
OutputLinks(0)=(Links=((LinkedOp=SeqAct_ActorFactoryEx'SeqAct_ActorFactoryEx_1')),DrawY=-1742,OverrideDelta=11)
VariableLinks(0)=(LinkedVariables=(SeqVar_Named'SeqVar_Named_4',SeqVar_Named'SeqVar_Named_5'),DrawX=2159,OverrideDelta=16)
ObjInstanceVersion=1
ParentSequence=Sequence'Main_Sequence'
ObjPosX=2120
ObjPosY=-1776
DrawWidth=78
DrawHeight=63
Name="SeqAct_Destroy_1"
ObjectArchetype=SeqAct_Destroy'Engine.Default__SeqAct_Destroy'
End Object
ExpectedType=Class'Engine.SeqVar_Object'
FindVarName="FMG_RussianA"
ObjInstanceVersion=1
ParentSequence=Sequence'Main_Sequence'
ObjPosX=2160
ObjPosY=-1608
ObjColor=(B=255,G=0,R=255,A=255)
DrawWidth=32
DrawHeight=32
Name="SeqVar_Named_5"
ObjectArchetype=SeqVar_Named'Engine.Default__SeqVar_Named'
End Object
Begin Object Class=SeqVar_Named Name=SeqVar_Named_4
ExpectedType=Class'Engine.SeqVar_Object'
FindVarName="FMG_RussianB"
ObjInstanceVersion=1
ParentSequence=Sequence'Main_Sequence'
ObjPosX=2088
ObjPosY=-1656
ObjColor=(B=255,G=0,R=255,A=255)
DrawWidth=32
DrawHeight=32
Name="SeqVar_Named_4"
ObjectArchetype=SeqVar_Named'Engine.Default__SeqVar_Named'
End Object
Begin Object Class=SeqVar_Object Name=SeqVar_Object_60
VarName="FMG_RussianB"
ObjInstanceVersion=1
ParentSequence=Sequence'Main_Sequence'
ObjPosX=2544
ObjPosY=-1504
DrawWidth=32
DrawHeight=32
Name="SeqVar_Object_60"
ObjectArchetype=SeqVar_Object'Engine.Default__SeqVar_Object'
End Object
Begin Object Class=SeqVar_Object Name=SeqVar_Object_59
ObjValue=ROFixedMGSpawnPoint'ROFixedMGSpawnPoint_6'
ObjInstanceVersion=1
ParentSequence=Sequence'Main_Sequence'
ObjPosX=2336
ObjPosY=-1536
DrawWidth=32
DrawHeight=32
Name="SeqVar_Object_59"
ObjectArchetype=SeqVar_Object'Engine.Default__SeqVar_Object'
End Object
Begin Object Class=SeqVar_Object Name=SeqVar_Object_58
VarName="FMG_RussianA"
ObjInstanceVersion=1
ParentSequence=Sequence'Main_Sequence'
ObjPosX=2448
ObjPosY=-1528
DrawWidth=32
DrawHeight=32
Name="SeqVar_Object_58"
ObjectArchetype=SeqVar_Object'Engine.Default__SeqVar_Object'
End Object
Begin Object Class=SeqVar_Object Name=SeqVar_Object_57
ObjValue=ROFixedMGSpawnPoint'ROFixedMGSpawnPoint_0'
ObjInstanceVersion=1
ParentSequence=Sequence'Main_Sequence'
ObjPosX=2392
ObjPosY=-1592
DrawWidth=32
DrawHeight=32
Name="SeqVar_Object_57"
ObjectArchetype=SeqVar_Object'Engine.Default__SeqVar_Object'
End Object
Begin Object Class=SeqAct_ActorFactoryEx Name=SeqAct_ActorFactoryEx_1
Begin Object Class=ROActorFactoryFixedMG Name=ROActorFactoryFixedMG_1
FixedMGClass=Class'ROGameContent.ROTurret_Maxim_HMG'
Name="ROActorFactoryFixedMG_1"
ObjectArchetype=ROActorFactoryFixedMG'ROGame.Default__ROActorFactoryFixedMG'
End Object
Factory=ROActorFactoryFixedMG'ROActorFactoryFixedMG_1'
SpawnCount=2
InputLinks(0)=(DrawY=-1730,OverrideDelta=15)
InputLinks(1)=(DrawY=-1707,OverrideDelta=38)
InputLinks(2)=(DrawY=-1684,OverrideDelta=61)
InputLinks(3)=(DrawY=-1661,OverrideDelta=84)
OutputLinks(0)=(DrawY=-1730,OverrideDelta=15)
OutputLinks(1)=(DrawY=-1707,OverrideDelta=38)
OutputLinks(2)=(DrawY=-1684,OverrideDelta=61)
OutputLinks(3)=(LinkDesc="Spawned 2",DrawY=-1661,OverrideDelta=84)
VariableLinks(0)=(LinkedVariables=(SeqVar_Object'SeqVar_Object_57',SeqVar_Object'SeqVar_Object_59'),DrawX=2415,OverrideDelta=16)
VariableLinks(1)=(LinkedVariables=(SeqVar_Object'SeqVar_Object_58'),DrawX=2485,OverrideDelta=78)
VariableLinks(2)=(ExpectedType=Class'Engine.SeqVar_Object',LinkedVariables=(SeqVar_Object'SeqVar_Object_60'),LinkDesc="Spawned 2",bWriteable=True,MinVars=0,DrawX=2563,OverrideDelta=156)
ObjInstanceVersion=1
ParentSequence=Sequence'Main_Sequence'
ObjPosX=2376
ObjPosY=-1768
DrawWidth=234
DrawHeight=155
Name="SeqAct_ActorFactoryEx_1"
ObjectArchetype=SeqAct_ActorFactoryEx'Engine.Default__SeqAct_ActorFactoryEx'
End Object
Begin Object Class=SeqAct_Destroy Name=SeqAct_Destroy_1
InputLinks(0)=(DrawY=-1742,OverrideDelta=11)
OutputLinks(0)=(Links=((LinkedOp=SeqAct_ActorFactoryEx'SeqAct_ActorFactoryEx_1')),DrawY=-1742,OverrideDelta=11)
VariableLinks(0)=(LinkedVariables=(SeqVar_Named'SeqVar_Named_4',SeqVar_Named'SeqVar_Named_5'),DrawX=2159,OverrideDelta=16)
ObjInstanceVersion=1
ParentSequence=Sequence'Main_Sequence'
ObjPosX=2120
ObjPosY=-1776
DrawWidth=78
DrawHeight=63
Name="SeqAct_Destroy_1"
ObjectArchetype=SeqAct_Destroy'Engine.Default__SeqAct_Destroy'
End Object
On the ActorFactory EX, connect the SPAWN POINT connection(s) to the ROSkeletalMeshSpawnPoint you placed in your level.
NOTE: The reason we destroy the fixed MGs is because no more than one FMG will spawn at a location. When the map restarts, we always want fresh equipment in the field.
IMPORTANT: Do NOT destroy the spawn location(s) but rather the object that represents the fixed MG in Kismet instead. I have called it FMG_RussianA and FMG_RussianB in my example.
The Spawn Count (ActorFactoryEX -> SeqAct_ActorFactory -> Spawn Count) section allows for random selection a spawn location when the number is less than the total number of attached spawn locations.
That should get you going with fixed MGs.
Setting up the Overhead Map
ObstaclesObstacle Static Meshes
CoverCover Nodes and Slots
VolumesAmmo Resupply
Spawn Protection
Map Boundaries
No Artillery
DestructiblesDestructible Static Meshes
KismetObjective Captured
Spoiler!
This action is called when an objective is called. It does not keep track of the current objective status.
Max Players
Spoiler!
This action allows you to specify different kismet layouts for each player size group (16, 32, 64).
Ariel Recon
Spoiler!
This action allows you specify matinee tracks to be played for when aerial recon is called in for each team. There is code to replace the interpactor you specify in the matinee so the correct model is displayed for each team's plane.
Enable PlayerStartGroup
Spoiler!
The action allows you specify the team to spawn in the associated volumes. You can also disable all volumes associated.
Activate Objective
Spoiler!
This action takes the associated objective and make its it active as long as it is both enabled and not locked. You can also use this action to disable objectives.
Enable Objective
Spoiler!
By default all objectives are disabled. This action will enable the associated objective(s) for later activation. This can also disable radios.
Enable Radio
Spoiler!
This action will enable all radios associated with it. There is no need to further activate it like the objectives.
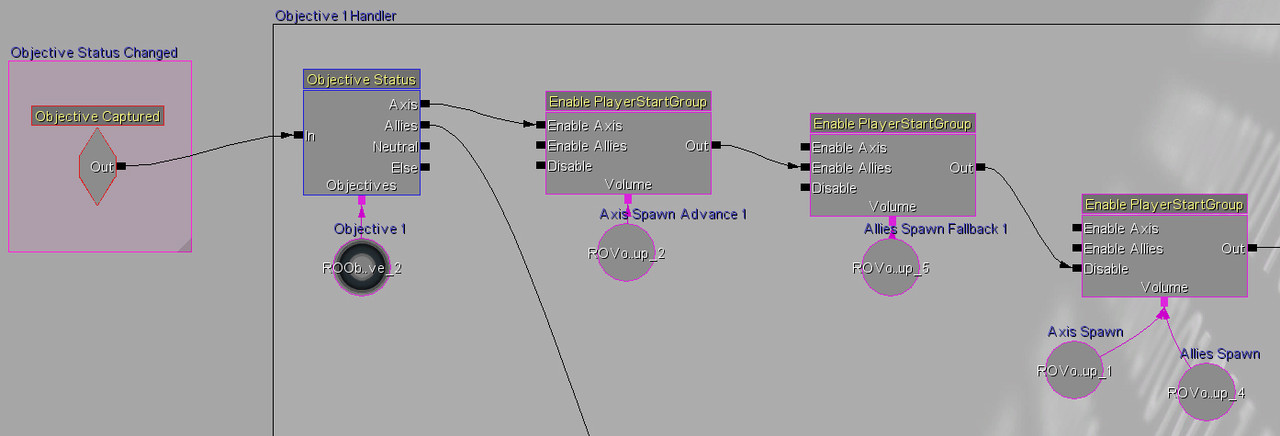
Objective Status
Spoiler!
This action will check current status of the objective associated with it when called. You then can specify a new chain of events based whether Axis/Allies own the objective (or Neutral).
Lock Objective
Spoiler!
This action will lock all objectives associated with it so it cannot be activated by other kismet actions. It can also be used to unlock objectives.
