Hey mappers and modders united!
I've put together a small handful of various mapping related guides but never really advertised them much on the forum. I'm considering making more in the new year, and so I thought I'd make a topic for organization's sake and ease of access.
Now keep in mind that, as most of us on here I believe, I am just an amateur who picked up mapping as a past time hobby. I've been working in the SDK for only a year (at this current writing) and have primarily learned by doing and closely studying the work of others. That said, I feel that I am a fast learner with a good enough eye for detail that I can offer these guides with at least some confidence that they can be of help to others.
I will add to and update this thread whenever I've put together a new guide, and will answer any questions people might have in relation to them. I am also always open to feedback, suggestions and corrections from anyone to help improve or fix any possible mistakes/misinformation these guides might suffer.
[GUIDE] #1 - Combining Floor Meshes
* Combining multiple single floor meshes into a single new floor
* Generating UV's and Splattermaps for seamless lighting and blood splatter
* Creating custom collision models for the new floors
[GUIDE] #2 - Tips on Creating Interesting Room Geometry
* Dressing your walls, ceiling and floor up to look visually interesting
* How to avoid having walls that feel flat and sterile to look at
* Using performance friendly meshes to add world geometry
[GUIDE] #3 - How to take Interesting Screenshots
* Tips and tricks on how to take spectacular screenshots for your map
* Using in-game console commands
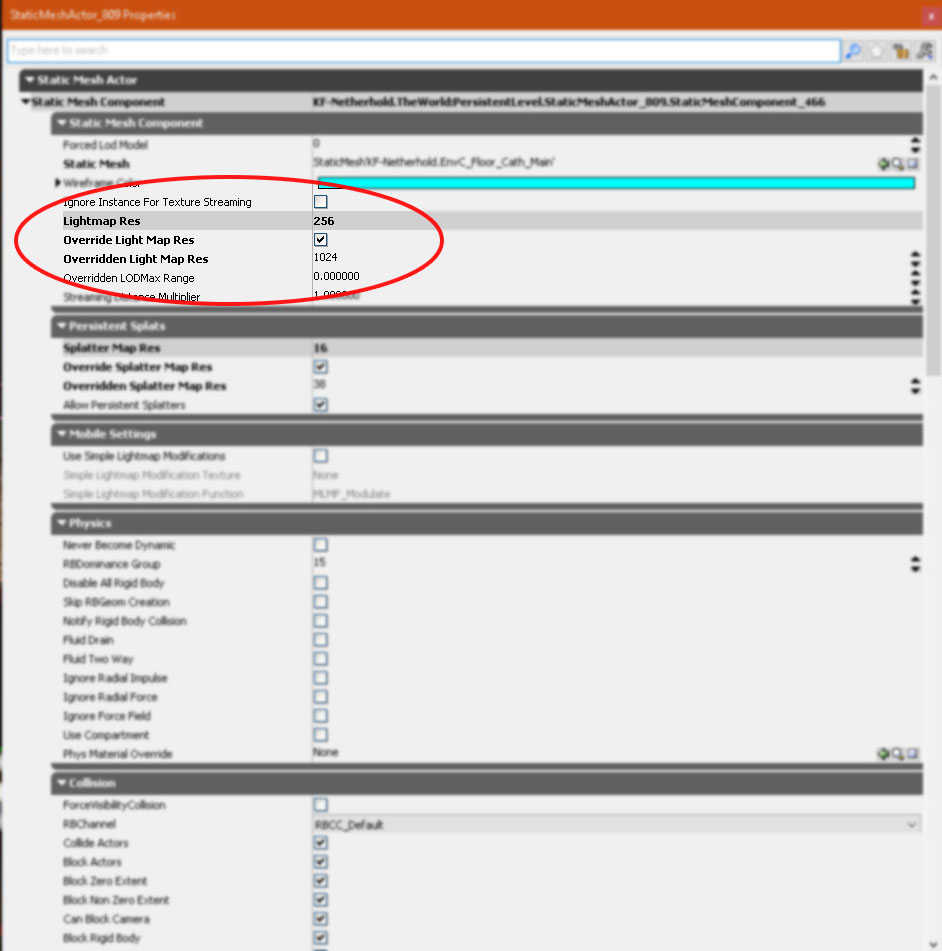
[GUIDE] #4 - Shadows and Lightmap Resolutions
* Talking about the differences between Dynamic and Static shadows
* How to create sharp and crisp static shadows by Overriding Lightmap Resolutions
[GUIDE] #5 - How to do Blood Splatter (splattermap configuration)
* Overriding splattermap resolutions on meshes
* Combining meshes to produce seamless blood splatter
* Tips on how to hide segmented blood splatters without combining meshes
* Combining lessons to configure splatters on an actual fully detailed room
[GUIDE] #6 - Building a custom Destructible Actor
* Assembling an intermediately advanced KFDestructible Actor from scratch
* Basic instructions on how to add Sub objects, Damage mods and spawn Actors on destruction
* Not originally intended to be a guide, but for lack of better serves the purpose
[GUIDE] #7 - Destructible Lights
* Building a basic multi-stage destructible light from scratch
[video=youtube;zwBYyejeK-Y]https://www.youtube.com/watch?v=zwBYyejeK-Y[/video]
[GUIDE] #8 - Creating Volumes
* Using the Brush to create basic and semi-advanced volumes
* Wrapping buildings in Indoor Lighting Volumes
* Blocking off areas with Blocking Volumes and Pawn Blocking Volumes
* Making a ramp-shaped Collision volume for movement aid
* Putting down Trigger volumes and hooking them up to events in Kismet
[GUIDE] #9 - Basic Lighting
* Using and setting up Skylights and Dominant Directional Light
* Creating Lighting Volumes for correct Indoor and Outdoor lighting
* Pointlights vs. Spotlights and their (dis)advantages
* Lighting performance and optimization
* Shadows: Dynamic vs. Static vs. No shadows
* Lightmap Resolutions, when, why and how
[GUIDE] #10 - Basic Movement Optimization
* Smoothening out corners and crevices (and why you should care)
* Preventing players from getting stuck on environmental detail
* Wrapping world geometry in manually shaped Blocking Volumes
* Collision modes: Block All vs. Block Weapons
[video=youtube_share;vb-enruIrR4]https://youtu.be/vb-enruIrR4[/video]
I've put together a small handful of various mapping related guides but never really advertised them much on the forum. I'm considering making more in the new year, and so I thought I'd make a topic for organization's sake and ease of access.
Now keep in mind that, as most of us on here I believe, I am just an amateur who picked up mapping as a past time hobby. I've been working in the SDK for only a year (at this current writing) and have primarily learned by doing and closely studying the work of others. That said, I feel that I am a fast learner with a good enough eye for detail that I can offer these guides with at least some confidence that they can be of help to others.
I will add to and update this thread whenever I've put together a new guide, and will answer any questions people might have in relation to them. I am also always open to feedback, suggestions and corrections from anyone to help improve or fix any possible mistakes/misinformation these guides might suffer.
[GUIDE] #1 - Combining Floor Meshes
* Combining multiple single floor meshes into a single new floor
* Generating UV's and Splattermaps for seamless lighting and blood splatter
* Creating custom collision models for the new floors
[GUIDE] #2 - Tips on Creating Interesting Room Geometry
* Dressing your walls, ceiling and floor up to look visually interesting
* How to avoid having walls that feel flat and sterile to look at
* Using performance friendly meshes to add world geometry
[GUIDE] #3 - How to take Interesting Screenshots
* Tips and tricks on how to take spectacular screenshots for your map
* Using in-game console commands
[GUIDE] #4 - Shadows and Lightmap Resolutions
* Talking about the differences between Dynamic and Static shadows
* How to create sharp and crisp static shadows by Overriding Lightmap Resolutions
[GUIDE] #5 - How to do Blood Splatter (splattermap configuration)
* Overriding splattermap resolutions on meshes
* Combining meshes to produce seamless blood splatter
* Tips on how to hide segmented blood splatters without combining meshes
* Combining lessons to configure splatters on an actual fully detailed room
[GUIDE] #6 - Building a custom Destructible Actor
* Assembling an intermediately advanced KFDestructible Actor from scratch
* Basic instructions on how to add Sub objects, Damage mods and spawn Actors on destruction
* Not originally intended to be a guide, but for lack of better serves the purpose
[GUIDE] #7 - Destructible Lights
* Building a basic multi-stage destructible light from scratch
[video=youtube;zwBYyejeK-Y]https://www.youtube.com/watch?v=zwBYyejeK-Y[/video]
[GUIDE] #8 - Creating Volumes
* Using the Brush to create basic and semi-advanced volumes
* Wrapping buildings in Indoor Lighting Volumes
* Blocking off areas with Blocking Volumes and Pawn Blocking Volumes
* Making a ramp-shaped Collision volume for movement aid
* Putting down Trigger volumes and hooking them up to events in Kismet
[GUIDE] #9 - Basic Lighting
* Using and setting up Skylights and Dominant Directional Light
* Creating Lighting Volumes for correct Indoor and Outdoor lighting
* Pointlights vs. Spotlights and their (dis)advantages
* Lighting performance and optimization
* Shadows: Dynamic vs. Static vs. No shadows
* Lightmap Resolutions, when, why and how
[GUIDE] #10 - Basic Movement Optimization
* Smoothening out corners and crevices (and why you should care)
* Preventing players from getting stuck on environmental detail
* Wrapping world geometry in manually shaped Blocking Volumes
* Collision modes: Block All vs. Block Weapons
[video=youtube_share;vb-enruIrR4]https://youtu.be/vb-enruIrR4[/video]
Last edited: